- Advanced BGP Configurations
- BGP on Loopback Interfaces
- Route Reflectors
- OSPF + iBGP on Loopbacks Configuration on FortiGate
Advanced BGP Configurations
Recursive Resolution
When a router learns a route via BGP, the route says “to reach network X, send traffic to next-hop Y.” But what if next-hop Y isn’t directly connected to your router? The router needs to figure out how to reach Y first. Recursive resolution is when the router looks up the next-hop address in its own routing table to find the actual outgoing interface and gateway to use.config router bgp
set recursive-next-hop enable
end
By default, BGP routes are not considered when a BGP next hop requires recursive resolution (only static, connected, OSPF, etc.). They are considered when recursive-next-hop is enabled. Recursive resolution will resolve to one level.
Conditional Advertisement
BGP Conditional Advertisement allows the router to advertise a route only when certain configured conditions are met.
config router bgp
    config neighbor
        edit "2.2.2.2"
            config conditional-advertise
                edit "2224"
                    set condition-routemap "2814" "2824"
                    set condition-type non-exist
                next
            end
        next
    end
end
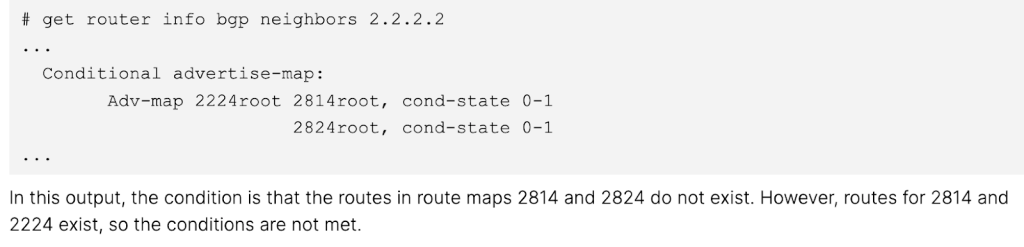
The above example configuration states that the route maps objects, 2814 and 2824, will only be advertised if they do not exist. In this scenario, the route map has match conditions for three subnets, 172.28.1.0/24, 172.28.2.0/24 and 172.22.2.0/24. This means that if the peer network advertises any of these three subnets to the FortiGate, the FortiGate will not advertise these three networks back out.
- The route maps listed within set condition-routemap are the conditions that must be met in order to execute the advertise-routemap (“2224” in this example).
- Given that two condition route maps are set in this example, both the 2814 and 2824 route maps route map conditions must not be met (non-exist) in order for the 2224 route map to be advertised.
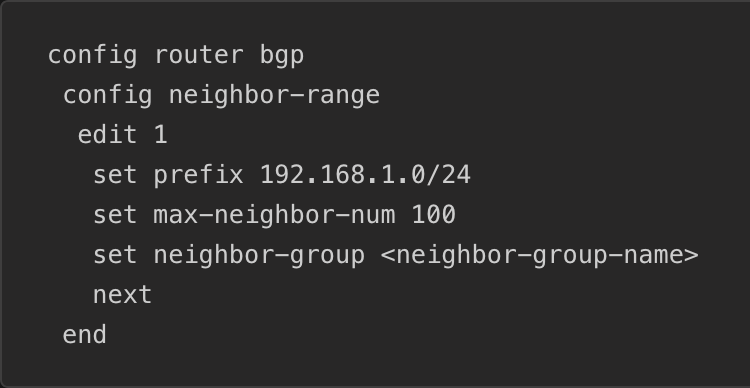
Neighbor Range
A Neighbor Range allows for you to specify a subnet such that neighbors will be configured automatically if their source IP falls within that range.
Neighbor Group
Neighbor Group can be used to share the same neighbor attributes among group members, avoiding having to repeat configurations for multiple neighbors.config router bgp
config neighbor-group
edit "sites"
set soft-reconfiguration enable
set remote-as 65510
set local-as 65520
set local-as-no-prepend enable
set local-as-replace-as enable
set route-map-in "filter1"
set keep-alive-timer 30
set holdtime-timer 90
set update-source "port1"
set weight 1000
set password ENC ******
next
end
end
This could be useful when you are peering from a hub to many spokes that all use the same password. You can assign all of your spokes to the same neighbor-group and simply set password ENC [password].
As seen in the section above, you can also apply a neighbor-group from within a neighbor-range, which will set the neighbor-group conditions to any peers within the specified range.
When using a Neighbor Group, the FortiGate will respond to peering requests within that range but not initiate requests itself. This is a default behavior that can be changed via set passive disable.
Address and Address Group objects as BGP Networks (FortiOS 7.6+)
Rather than setting and keeping up to date your list of BGP networks manually, you can include addresses and address groups.
- Within your Address or Address Group object, set allow-routing enable.
- Only IP subnets and Interface subnet objects (address objects auto-created when you create an interface) can be referenced, not FQDNs, IP Ranges, Geographies, dynamic address objects, etc.
Default Originate
Enabling the capability-default-originate command within a peer configuration will cause the FortiGate to advertise the 0.0.0.0/0 default route to the peer without including 0.0.0.0/0 in the list of BGP networks.
Secure BGP sessions with MD5 hashing
Within a peer configuration you can set password [password] to force authentication with your peer. The same password will need to be set on the peer.
Soft Reconfiguration
BGP is configured such that inbound filtering only occurs when routes are received from your peer. When soft reconfiguration is enabled, it stores a copy of the pre-filter routes locally in memory. This allows you to update filters and “re-run” the routes through them to result in an updated post-filter set of routes without necessitating a BGP hard-reset.
When soft reconfiguration is enabled, you gain the ability to see received routes pre-local-filtering.
get router info bgp neighbors [peer IP] received-routeswill show your pre-filter received routes.get router info bgp neighbors [peer IP] routeswill show your post-filter received routes.
Route Refresh
Just like Soft Reconfiguration, Route Refresh was created to solve the issue of necessitating a hard BGP reset every time you change your filters. Route Refresh, however, allows for this capability without the additional memory and CPU load created by storing a pre-filter set of routes. Route Refresh simply sends a message to the peer when the local filters are updating, asking for updated pre-filter routes.
- The one downside of Route Refresh has a slightly slower update/refresh time, roughly 30 seconds, based on the default eBGP advertisement-interval.
- Route Refresh is enabled by default on modern FortiGates.
Soft Reset and Hard Reset
A hard reset drops all of your peering’s BGP routes from the routing table and forces a temporary shutdown of the BGP session itself.
execute router clear bgp [ip | all | ipv6] <neighbor IP>
- As this will affect active traffic flows, it is recommended to use a hard reset only after attempting a soft reset.
- A hard reset will occur when enabling/disabling BGP capabilities and settings, such as Route Refresh.
- Enabling/Disabling the Soft Reconfiguration capability will not trigger a Hard Reset.
- A hard reset is required to reflect changes to BGP timer values.
A soft reset applies new or changes to existing routing objects such as route maps, without the traffic disruption caused by a hard reset.
execute router clear bgp ip <neighbor IP> soft [in | out]
- Technically you should not “need” to soft reset after an inbound route filter change, as the enabled-by-default Route Refresh capability should send an update message after the change, however I often soft reset out of habit and extreme impatience.
- Outbound route filter changes will necessitate a soft reset as Soft Reconfiguration and Route Refresh capabilities do not apply to advertised routes.
Summary: Soft Reconfiguration, Route Refresh, Soft Reset, Hard Reset
- Soft Reconfiguration: Store received routes before policy application in memory
- Route Refresh: BGP capability to request peer to re-advertise all prefixes
- Soft Reset: Reapply policies, keep the session
- Hard Reset: Drop TCP session, full BGP re-establishment
Next Hop Self
The next-hop-self configuration will need to be applied to a peering any time the next hop for a route it is advertising is not reachable by its peer. This is commonly seen with iBGP routers advertising eBGP routes and in hub-and-spoke topologies where spokes peer through the hub.
- Next Hop Self is not required in eBGP peerings as eBGP changes the next hop for routes it advertises.
next-hop-self-rris used to set the next hop to self for routes a RR reflects.- Commonly used to force hub transit.
Maximum Prefixes
You can configure a maximum number of prefixes that are allowed to be received by a peer.
- When the maximum prefix amount is hit, the BGP peering will be torn down.
- The BGP session will continue to flap up and down each advertisement-interval, 30 seconds by default, until the number of prefixes received falls back below the limit.
- You can
set maximum-prefix-warning-only enableto only produce a log when the prefix limit is reached. This will show up in System Events > Router Events and could then be used via Automation Stitches or FortiAnalyzer Event Handlers to notify NOCs or attempt auto-remediations. - A use case here is stopping a peer network that you don’t control from injecting mass amounts of networks into your, in case of a misconfiguration.
Local AS
You can config the Local AS setting to mask your actual AS, from the perspective of your peer. I recently ran into a real use case for this when standing up a BGP peering with one of our partners at work. We use a very common private AS and so do they. We set local-as [AS] and we appeared as the masked AS from their perspective, allowing us to peer without conflict or issue.
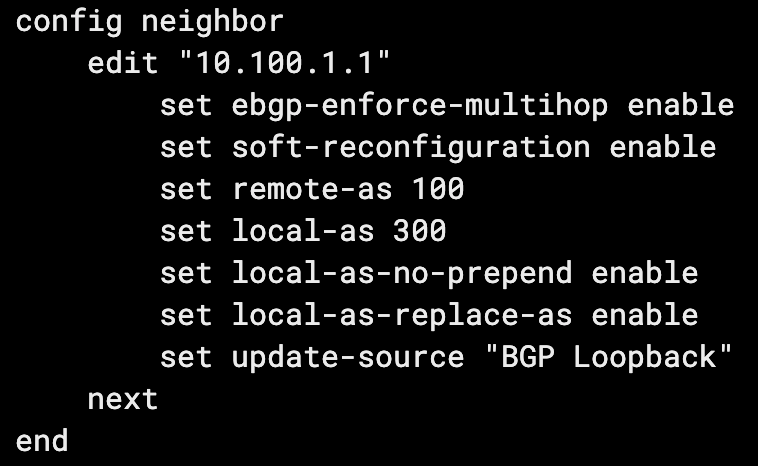
- Setting
local-as-replace-aswill stop your real AS from being included in the AS path from the perspective of your peer (their received AS path from you). - Setting
local-as-no-prependwill stop your local AS from being included in the AS path on inbound routes.
BGP Multipath
While covered more comprehensively in the dedicated ECMP document, it’s worth mentioning the BGP-specific ECMP configurations. ECMP, or Equal Cost Multipath, allows for multiple paths (interfaces) to the same destination (networks) to be used simultaneously. To allow multipath, the following BGP configuration should be applied:
config router bgp
    set ebgp-multipath enable
end
And/Or:
config router bgp
    set ibgp-multipath
end
For paths to be eligible for eBGP/iBGP multipath, they must have the same local preference, AS path, origin, MED, and next-hop reachability. The neighbor BGP router ID and neighbor IP address attributes are not required to match.
The maximum number of eBGP/iBGP additional paths to be considered for multipath can be configured with the following commands:
config router bgp
    set additional-path enable
    set additional-path-select [2 - 255]
end
BGP Aggregation/Summarization
Aggregation allows you to summarize multiple specific routes into a less specific route including the specific members. The only decent metaphor I can think of for this is when you visit a large hotel. You walk down the hallway and there are normally signs that point you towards a group of room numbers. Rather than the sign having an arrow for every specific room number, it has a range of room numbers.
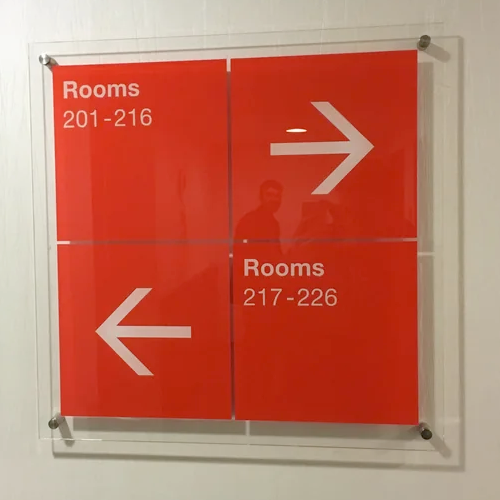
Even if the room “205” didn’t exist and was actually just a utility closet without a room number, you’d still say rooms “201-216” were to the right. This is what we see in route summaries. For example we might have the following routes advertised to our neighbor:
Rather than the neighbor receiving 8 routes for these 8 specific destinations, we can advertise a summary route that includes all 8 destinations. In this case, we’ll advertise 10.100.1.0/28. Here’s how we configure it:
config router bgp
    config aggregate-address
        edit 1
            set prefix 10.100.1.0/28
            set summary-only enable
        end
    end
end
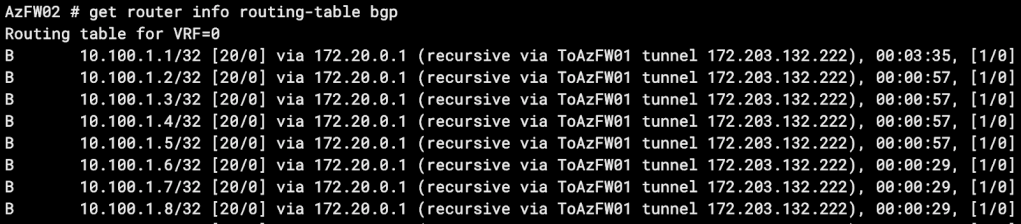
After a soft reset, when we check out routes received by our peer we see this:

You can imagine how valuable this becomes, especially if you’re advertising hundreds or thousands of specific routes. One thing to note is that 10.100.1.0/28 includes the IP host range 10.100.1.1 – 10.100.1.14, meaning our peer will route 10.100.1.9 – 10.100.1.14 to us, even though we don’t actually have a route to these hosts.
It’s also important to note that in our configuration we enabled the summary-only setting. Let’s turn that off, soft reset, and check our peer received routes again:
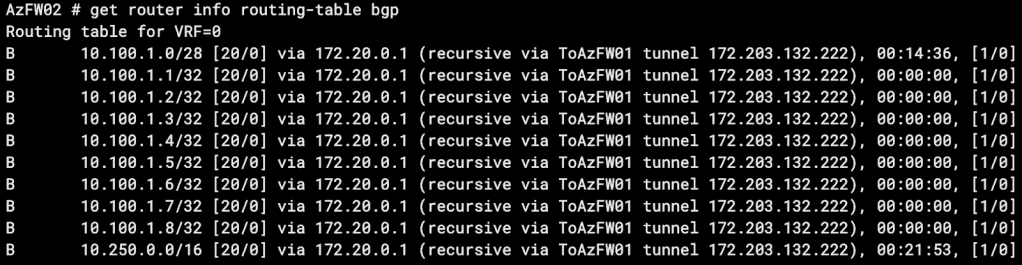
You can see we actually received the summary route as well as all of the specific routes.
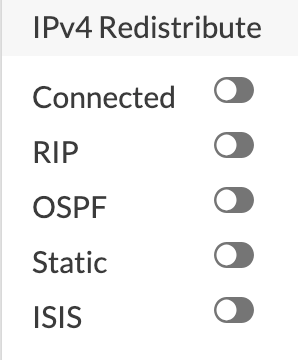
Route Redistribution into BGP
Redistribution allows you to inject other routes on your FortiGate into BGP, allowing you to advertise the injected routes to your BGP neighbors. On FortiGate, you can redistribute the following route types:
In our lab we have these 8 static routes that our peer doesn’t know about, but we want them to.
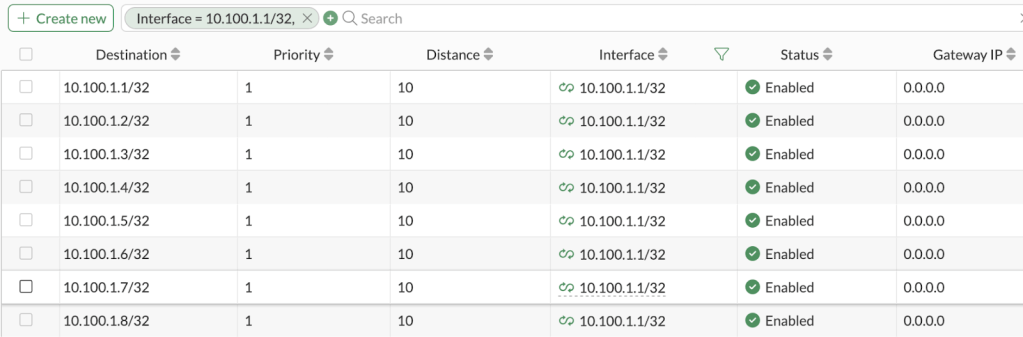
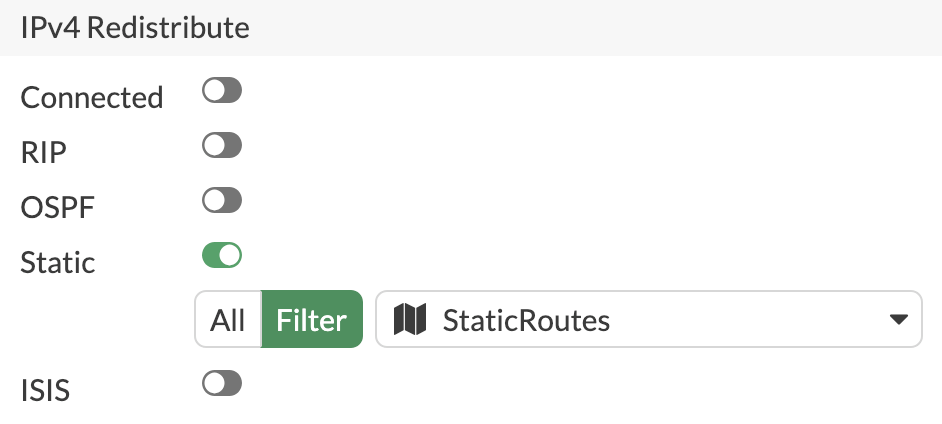
In our BGP settings we simply turn on Static redistribute and the routes will be advertised:
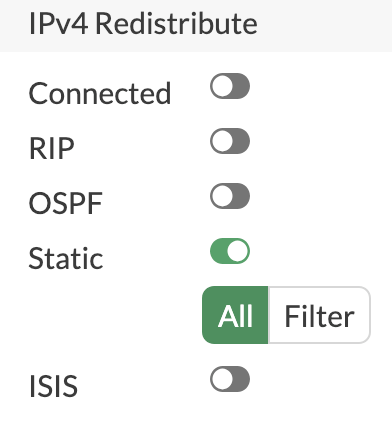
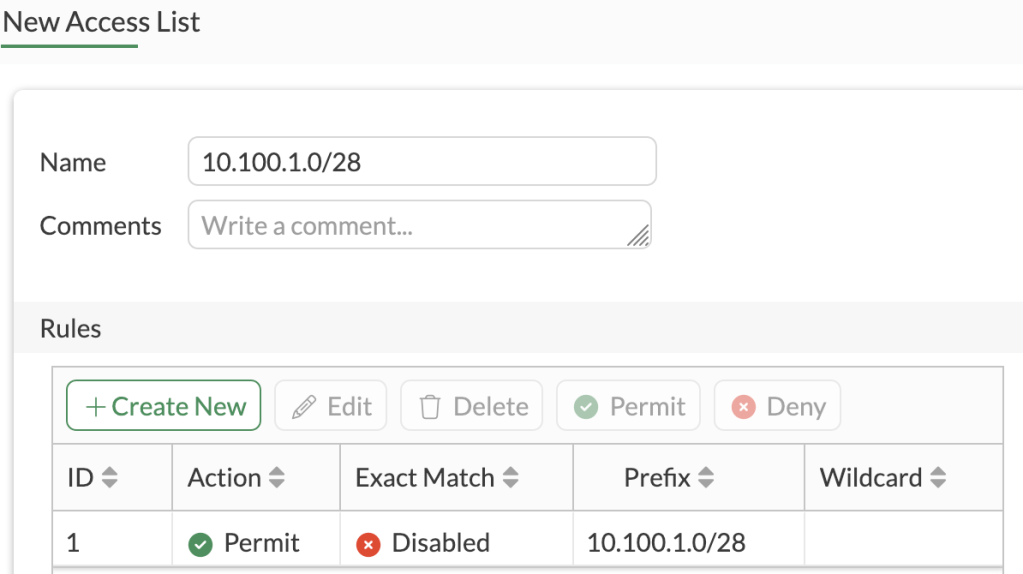
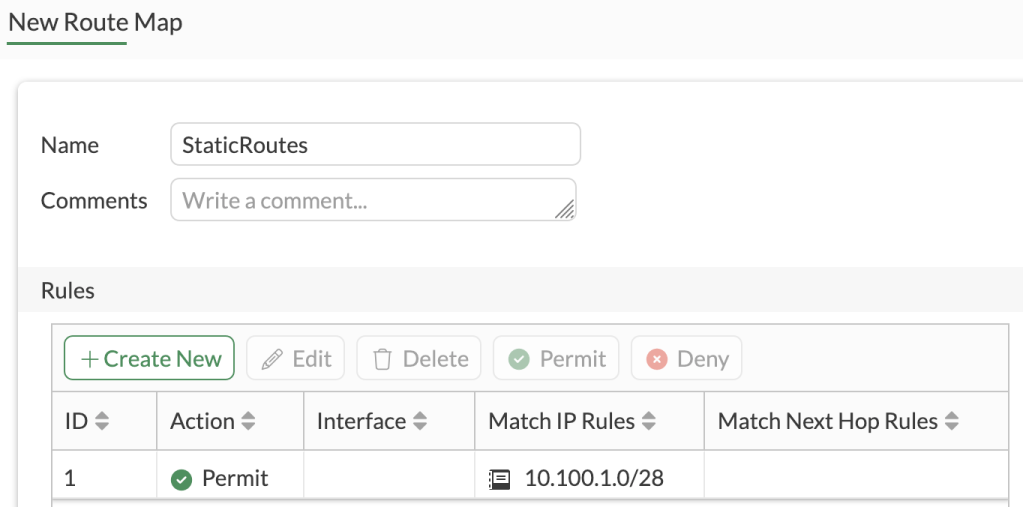
However, in our lab, we actually have quite a few additional static routes that we don’t want our peer to know about, so we’ll apply a filter. We only want to advertise our routes that fall within the 10.100.1.0/28 subnet, so we’ll create an Access List to match that subnets within (exact match disabled). We’ll then create a Route Map with an Allow rule matching the Access List, and apply that Route Map to the Static redistribution configuration.
We’ll soft reset our BGP peering and check received routes on our peer router:
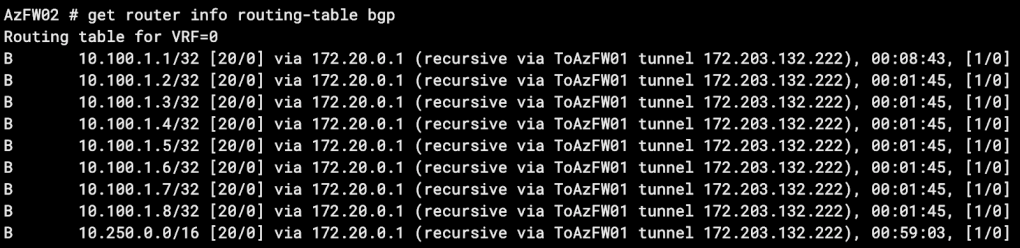
Something to consider regarding redistributing routes vs. simply adding them within your BGP networks configuration – when redistributed routes are received, the origin code will be a ?, while routes configured in BGP networks will show an iBGP origin.

- In the picture above, the 10.100.1.1 network is included in our BGP networks configuration, while the other 3 networks are redistributed.
BGP Network Import Check
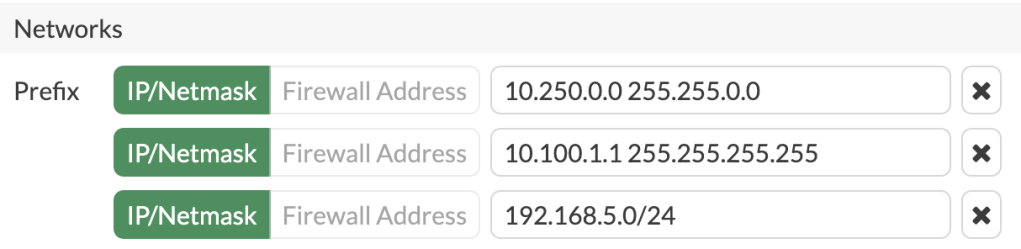
By default, BGP will not advertise a route included in its networks configuration if the route doesn’t already exist in the FortiGate’s routing table. For example, you may include the 192.168.5.0/24 route in your BGP config because that subnet represents a connected interface on your FortiGate. BGP will be able to advertise the route because there is already a 192.168.5.0/24 directly connected route in the RIB. If you attempt to advertise a route via BGP that you don’t have a route for, it won’t be sent out. You can allow this non-default behavior with the set network-import-check disable setting.
Let’s try it in the lab! We’ll add a network to BGP for which we don’t have an existing route in our RIB (192.168.5.0/24):
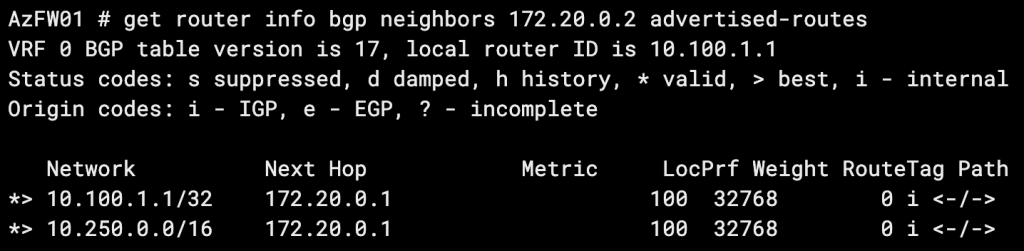
We check our advertised routes and see that subnet isn’t being advertised:
Now let’s turn off network-import-check:

When we check our advertised routes again, our route is there!
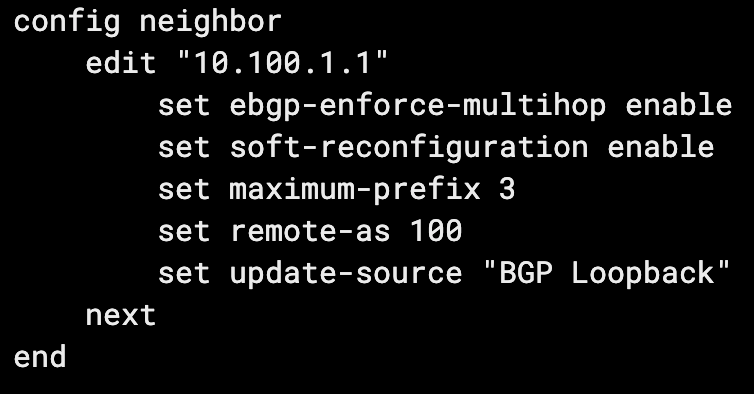
BGP on Loopback Interfaces
The common situation that leads to the BGP on loopbacks design is seen when you have peerings between two sites with redundant connections. For example you may have a hub-and-spoke design, with each spoke site having 2 or more ISP connections for redundancy. You’ll likely have IPSec tunnels or private links back to your hub. This will require two BGP peerings and four peer IPs, resulting in at least 2X the configuration time and a possibility of asynchronous routing. If you expand to 3 redundant links, now we’re looking at 3X the configuration time and a serious headache.
BGP on loopbacks solves this by creating your hub-to-spoke peerings using the loopback interface IPs themselves.
BGP on Loopback (Over IPSec VPN) Requirements:
- BGP Peering Settings:
- update-source set to the loopback interface
- enforce-ebgp-multihop enabled (eBGP only)
- Firewall Policy:
- A firewall policy allowing TCP port 179 traffic to your loopback from your link port (IPsec tunnel interface, physical port, VLAN, etc.)
- Routing:
- A static route from your loopback to the peer loopback via each link port OR
- An SD-WAN health check with a destination on the peer (typically a loopback interface, but NOT the BGP loopback interface*) and the two link ports as members
*Thank you Kevin for your correction here. Please see this article for a complete explanation as to why the peer’s BGP loopback must not be used as the health check IP.
Route Reflectors
Route Reflectors are used in iBGP to reduce the number of peerings required by a full-mesh topology. Their use is best depicted by the transition between these two diagrams:

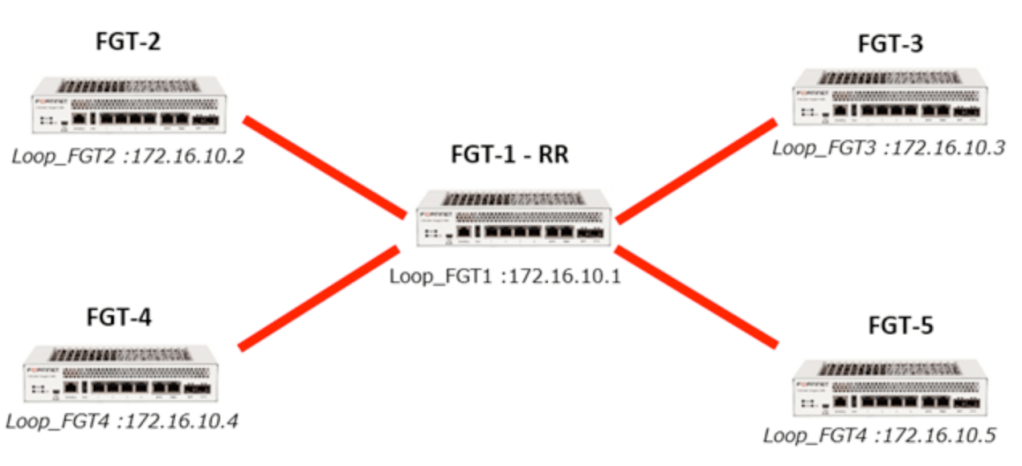
Simply described, rather than peering all routers with all other routers, all routers just need to peer with a route reflector.
- Routes advertised to the router reflector are then advertised to all of its other peers.
- The router reflector FortiGate will act as such when you enable
set route-reflector-clientwithin its configuration with each of its peers. - A router reflector cannot modify BGP attributes for routes that it reflects, but it can block reflected routes via route maps (or other BGP filtering methods).
- Starting in 7.6.1, with the application of the
rr-attr-allow-changeconfig, the RR can modify attributes.
- Starting in 7.6.1, with the application of the
- Routes received by the RR, from a non-RR client, will be advertised to RR clients only.
- Routes received by the RR, from an RR client, will be advertised to both RR clients and non-clients.
- Routes received by the RR, from an eBGP neighbor, will be advertised to both RR clients and non-clients.
OSPF + iBGP on Loopbacks Configuration on FortiGate
This routing configuration is commonly recommended in the networking community for its scalability and simplicity. OSPF is configured to share routes to loopback IPs. BGP is sourced from the same loopback IPs to allow for dual-WAN and multiple IPSec tunnels from each spoke router without having to stand up multiple BGP peerings. Here’s how to configure it in its simplest form between two FortiGates.
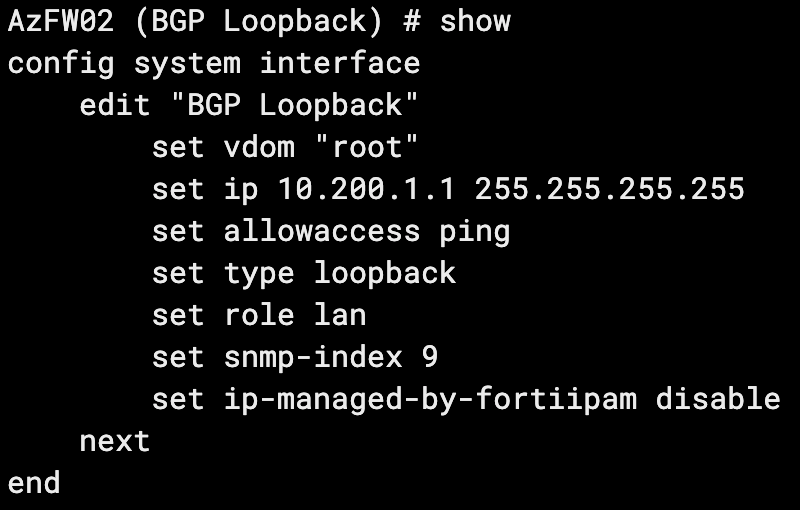
For this example, my lab is running two Azure FortiGate VMs, connected via an IPSec tunnel. Our loopbacks and tunnel IPs are as follows:
AzFW01
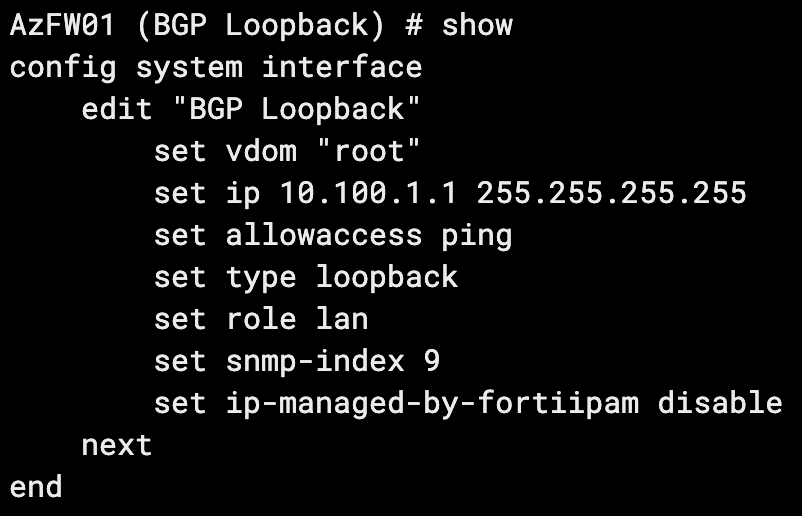
Loopback: 10.100.1.1
Tunnel IP: 172.20.0.1
AzFW02
Loopback: 10.200.1.1
Tunnel IP: 172.20.0.2
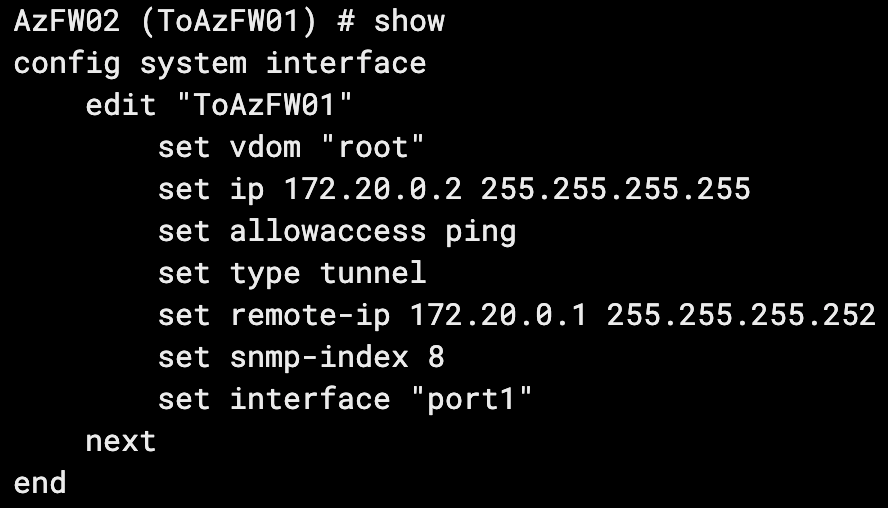
CLI Configurations:
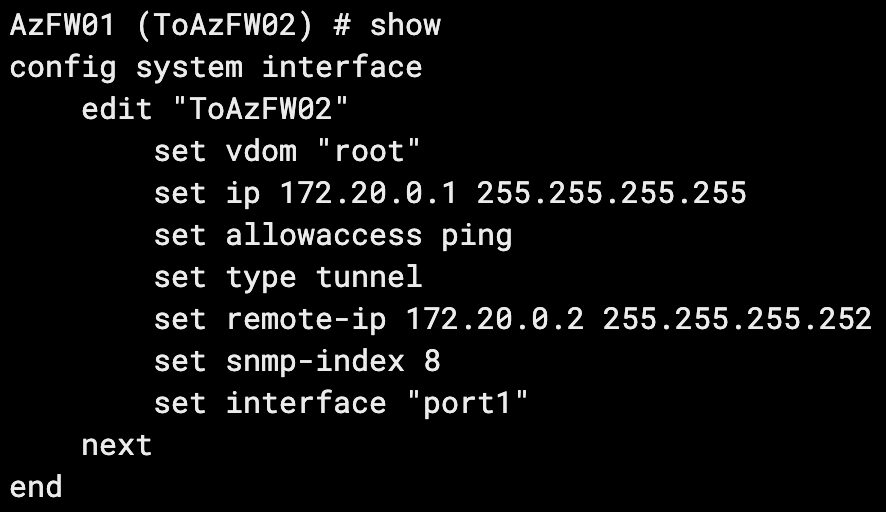
On our tunnel interface, we ensure we set our remote IP as our far side tunnel interface IP.
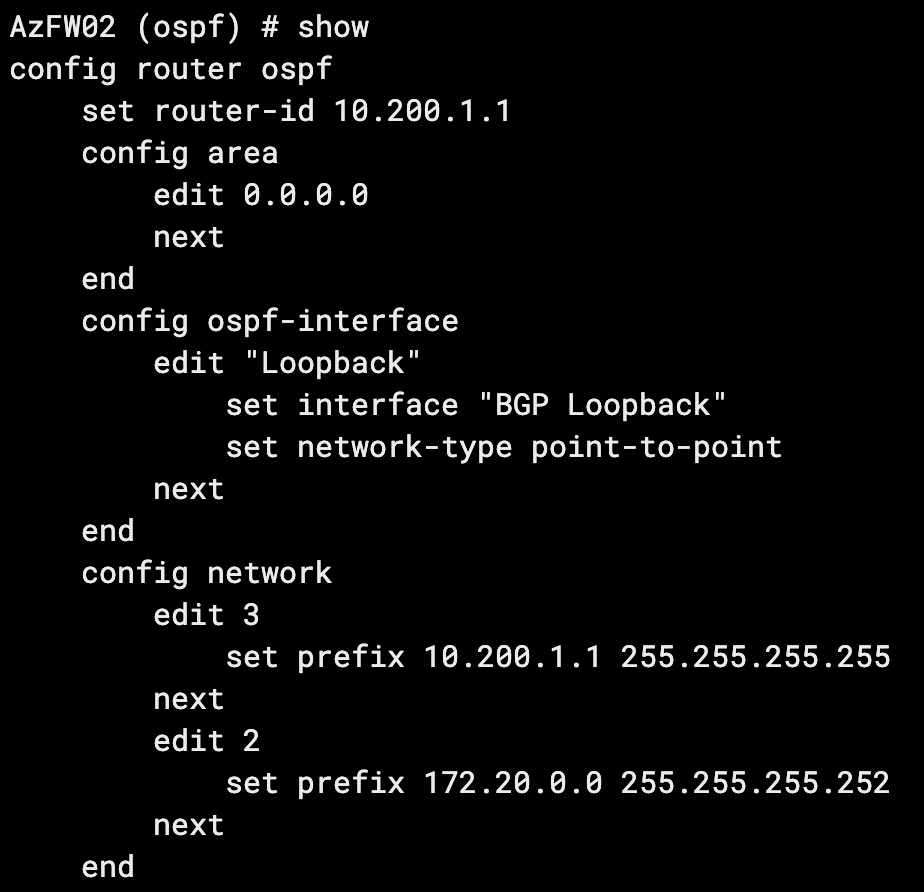
Now that our interfaces are configured, we can configure OSPF.
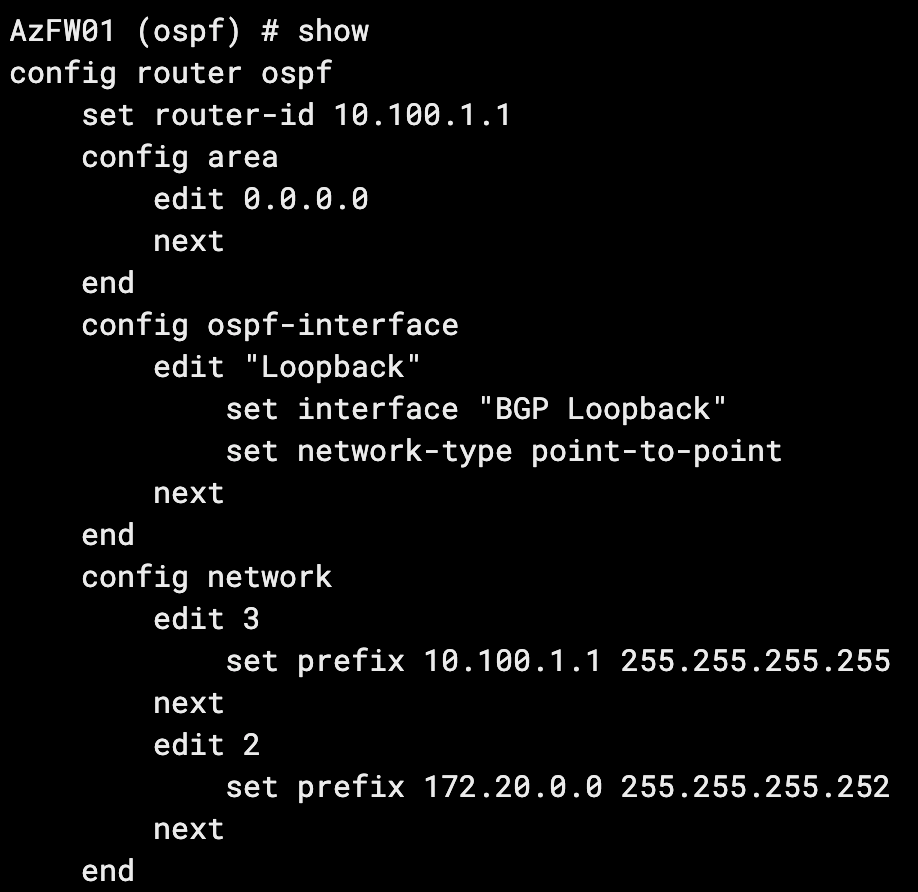
Key considerations:
- For simplicity’s sake we’re using a single area for our entire hub-and-spoke topology (scaling out the lab to 20+ spokes).
- The OSPF interface network type must be manually set to point-to-point. It will default to broadcast.
With the above configuration on both firewalls, our OSPF adjacency has come up:

And we have a route to our far-side loopback:

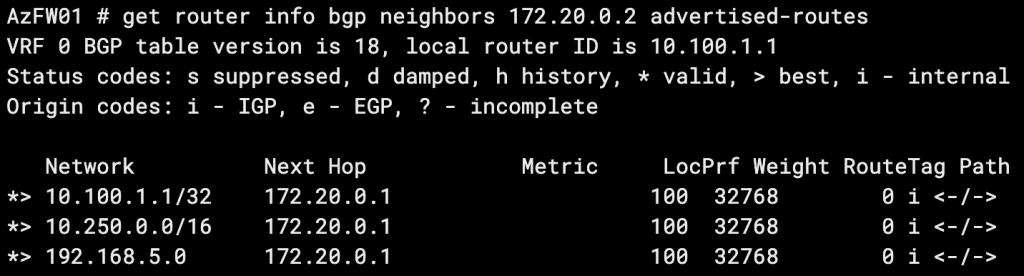
Finally, we’ll configure BGP on both routers and use the update-source setting to peer via our loopbacks:
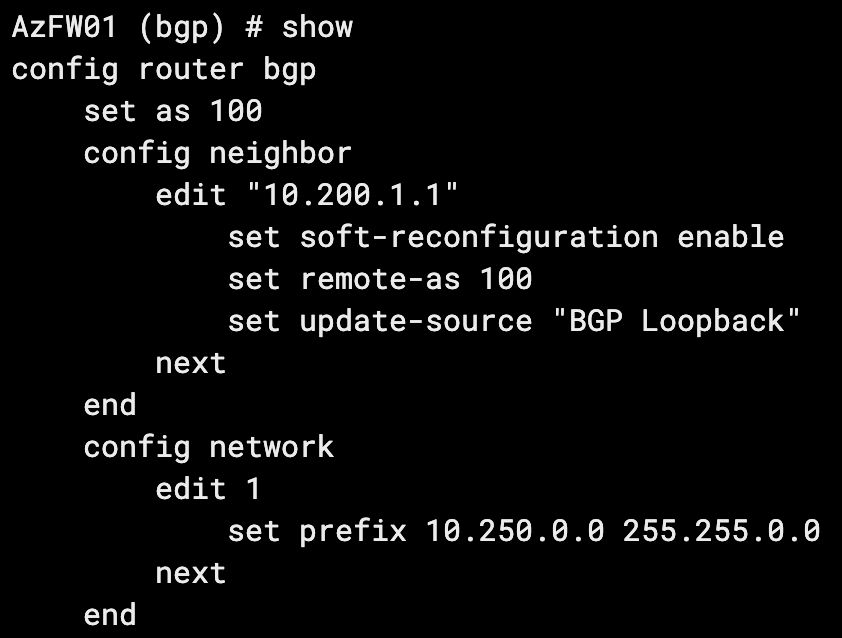
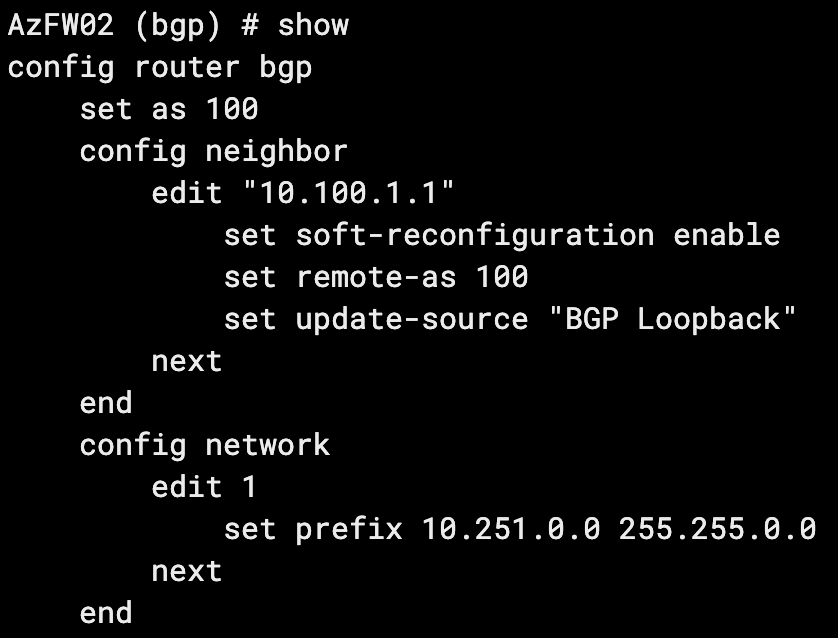
Our BGP peering is up:
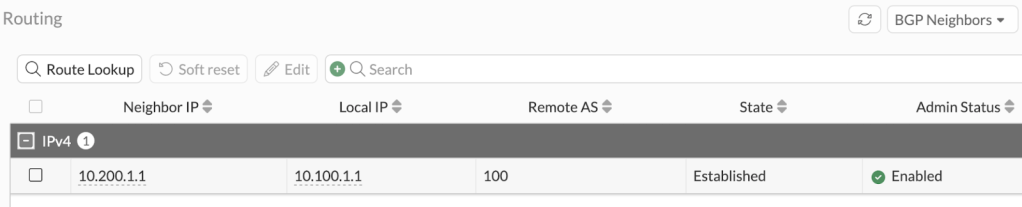
And we have received our neighbor’s 10.251.0.0/16 route:


Leave a comment