Not a bad week at all. Not at consistent as previous weeks and I’m a bit under hours but I just want to start this by emphasizing how useful the FDN Hands on Labs (HOL) are. I spent a good portion of the week going through the SD-WAN HOL. Need I repeat from last week’s blog post that the HOL guide is over 200 pages long? It’s 7 labs that cover everything from simple hub-and-spoke SD-WAN from scratch with Jinja Orchestrator to ADVPN 2.0 and ICMP embedded SLAs.
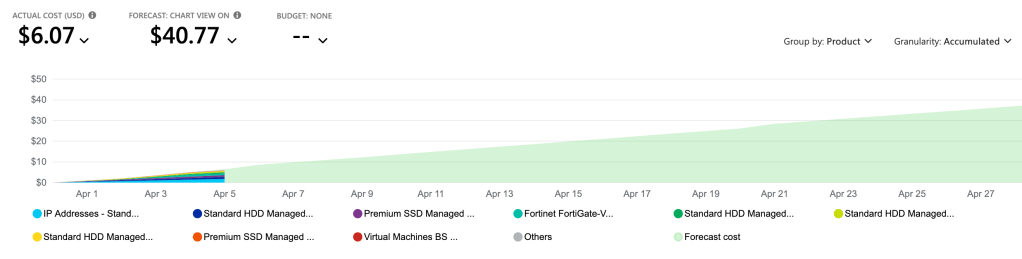
Quick update on lab costs as well – last month we got close to $50 after the FGT licensing free trials expired and before I got a chance to apply the eval licenses. This month we’re looking at something closer to $40.
No other big updates other than starting the Authentication and User Access Phase (Phase 4) today and a bit of trouble getting access the FortiAuthenticator VM in my lab. Hoping to figure that out tomorrow.
This week I spent with my foot in my mouth after last week’s post included me going on and on about how I didn’t know what to fill the next 2 weeks with to finish our the SD-WAN phase. Turns out there’s a lot more, and it was all under the SD-WAN Architecture section of the pre-release notes topic outline.
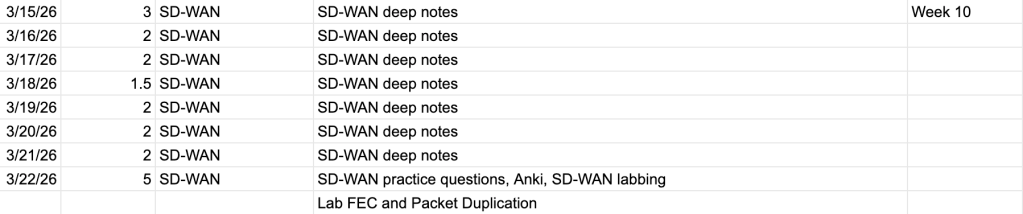
It turns out these 4 topics were a weeks worth of deep notes (and a little bit of labbing). From there, this weekend I began the SD-WAN 7.6 Hands-on Lab from the Fortinet Developer Network and it’s probably going to fill the next week on its own. Let’s just say the lab documentation is somewhere around 200 pages. I spent 4 hours on the first of 6-7 labs included in the HOL, although the first 2 hours were wasted on me getting stuck because of a simple typo while importing the Fortinet-provided Jinja template.
I did also spend some time this past week re-labbing ADVPN 2.0, just because I almost know for a fact it will be on the exam (it’s right there in the pre-release notes and it’s just a big offering for Fortinet in general). I still don’t feel perfectly comfortable, so I imagine I’ll do this at least 2 more times before I sit the exam.
In terms of timing I think I will probably do at least another 1.5 weeks with SD-WAN before a quick 2-4 day review of SD-WAN and Traffic Shaping. Then we’re moving right along to Authentication and Access Control and I’ll be excited to get the FortiAuthenticator VM spun up and poke around for the first time.
FortiGate Traffic Shaping – Guaranteed vs Maximum Bandwidth
Maximum Bandwidth is simple:
Sets a limit to the amount of bandwidth that can be used.
In a Traffic Shaping Profile, this is a percentage of the outbandwidth.
In a Traffic Shaper, this is a rate (eg. 40Mbps).
If you set the max to 50% of a 100Mbps WAN link, bandwidth is capped at 50Mbps even if the entire pipe is idle. Excess gets dropped (policing) or queued (queueing).
Guaranteed Bandwidth is more complex and less straightforward to understand. We can start by visualizing our egress interface as a pipe. We set our WAN link to 100Mbps, telling the FortiGate “this is the total capacity you have to work with.”
config system interface
    edit port2
        set outbandwidth 100000
    next
end
First, guaranteed bandwidth is a Reservation. When congestion is happening and multiple classes are competing, the FortiGate will always honor each class’s guaranteed amount before giving leftovers to anyone.
If Class A has 30% guaranteed and Class B has 20% guaranteed, and the pipe is saturated, Class A will get at least 30Mbps and Class B will get at least 20Mbps, regardless of priority. The guaranteed bandwidth is reserved and cannot be overridden.
Second, guaranteed bandwidth determines who gets the leftovers. After all guaranteed reservations are fulfilled, there is bandwidth leftover. The remaining bandwidth is distributed based on priority. Higher priority classes get bandwidth first. If two classes share the same priority, the remaining bandwidth is split proportionally to their guaranteed bandwidth ratio.
Let’s do an example with the same 100Mbps pipe and three classes:
VoIP: guaranteed 20%, max 100%, priority High
Web: guaranteed 30%, max 80%, priority Medium
General: guaranteed 10%, max 100%, priority Low
When the pipe is NOT congested, for example only 40Mbps is used, nobody cares about priorities or guarantees. Each class just uses what it needs, up to its maximum.
When the pipe IS congested, for example 150Mbps of demand hitting a 100Mbps pipe, it matters.
Honor the guarantees: VoIP gets 20Mbps, Web gets 30Mbps, General gets 10Mbps
40Mbps remains. VoIP (High priority) gets first dibs on leftovers, up to its maximum of 100Mbps. VoIP could take all remaining 40Mbps if it wanted. Let’s say it only needs 25Mbps more.
15Mbps remains. Web (Medium priority) gets next dibs on leftovers, up to its maximum of 80Mbps. Web could take all remaining 15Mbps if it wanted. Let’s say it only needs 5Mbps more.
10Mbps remains. General (Low priority) gets next dibs on leftovers, up to its maximum of 100Mbps. Let’s say it needs 20 Mbps more. It takes the remaining 10Mbps and another 10Mbps of its traffic is dropped or queued.
Summary
Guaranteed bandwidth protects you during congestion, regardless of priority. Priority determines who gets dibs on the leftover bandwidth.
This week has been all SD-WAN. And I by all SD-WAN I mean SD-WAN plus a bunch of other shit that relates to SD-WAN. The pre-release notes aren’t incredibly specific, but here are the topics they list:
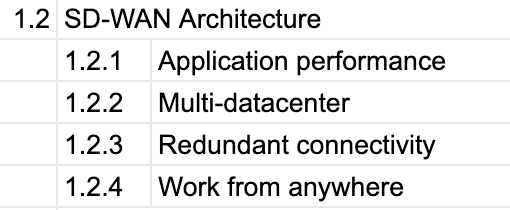
SD-WAN Architecture
Application performance
Multi-datacenter
Redundant connectivity
Work from anywhere
SASE
Prepping for SPA
SD-WAN On-Ramp
Secure Private Access
Routing
SD-WAN Routing
VPN
SD-WAN
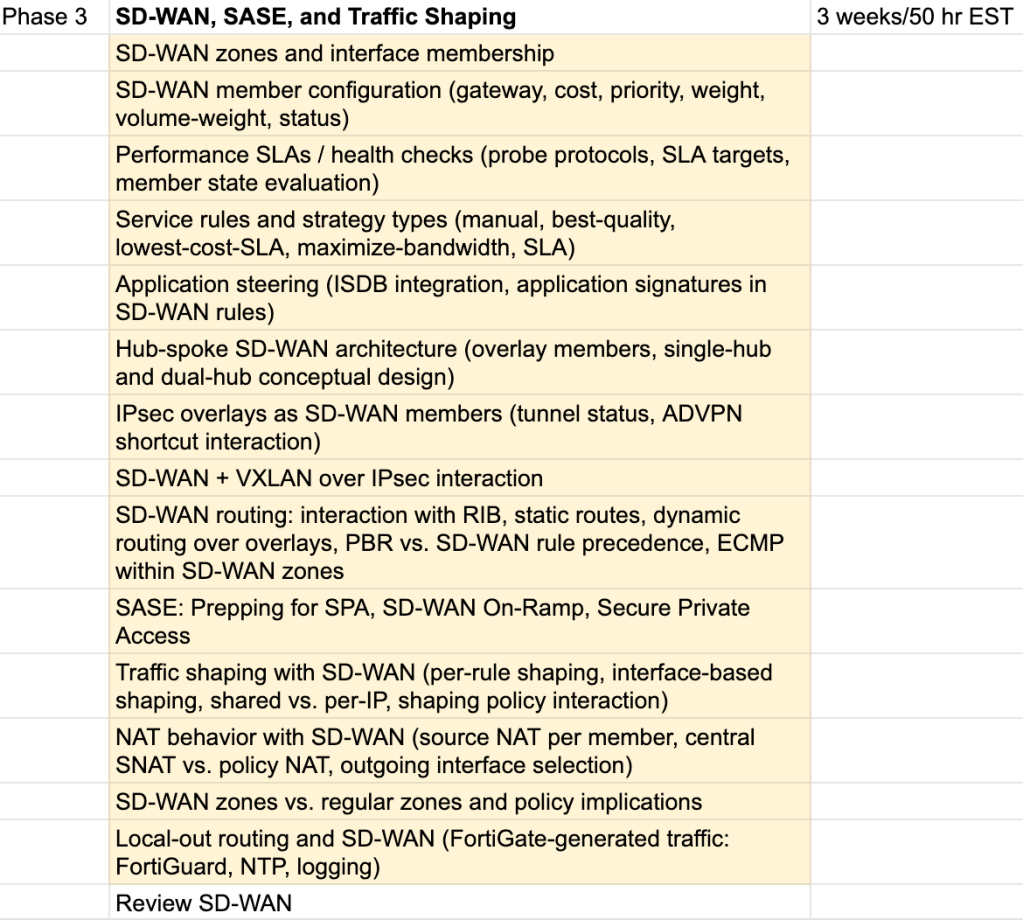
Based on this list, I worked up the following sub-topics to cover within my Phase 3 section:
Unfortunately it’s the end of day 8 and I do believe I’ve covered 80-90% of this. I do work with SD-WAN a lot in my day-to-day work environment but I’m a bit thrown off by the difference between my initial estimate and the current time worked. I had a similar feeling after finishing VPNs and Overlays. Things are just going a lot quicker than they did for my Phase 1 (Routing). Given that I went so in-depth for routing and covered many topics that I had not gone deep on before (OSPF, VRFs, Multicast, etc.), this makes some sense – but it’s still a weird feeling to almost be finished with what is supposed to be a 50 hour topic is closer to 20-25 hours. I don’t have a real solution for this at the moment other than telling myself I’ll come back to both VPNs and SD-WAN during my review phase but it doesn’t stop the worry that I may be missing chunks of content or simply not spending enough hours in the lab on these subtopics. The one thing I can do now is hope that there is updated topic documentation that gets released when (or before) the July 15th update – when NSE8 is official released.
Before we get into the NSE8 changes, as always, I’ll start with the time tracker. This week we finished up IPsec and Overlay VPNs and just today began SD-WAN. VPNs was a short phase 2 (of a total 7 phases I have planned) – roughly 3 weeks compared to Phase 1 (Routing) coming in at 6 weeks.
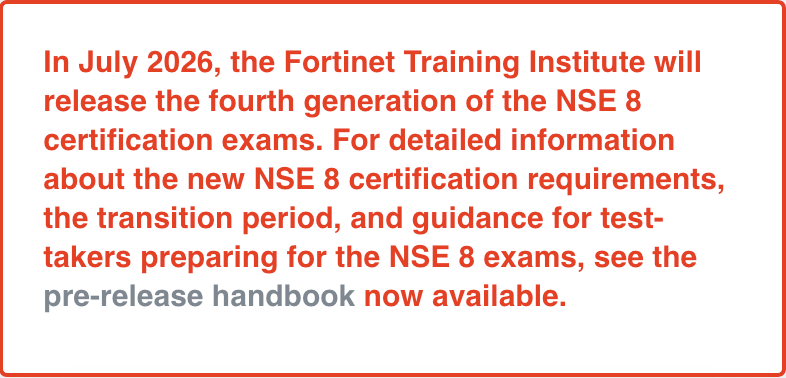
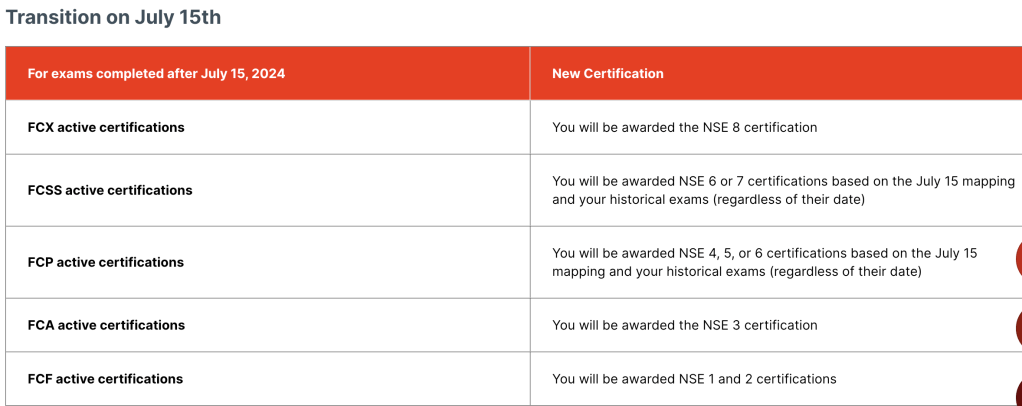
The big change: the NSE8 Core module is an in-person practical exam. I know from my first brief start with FCX that the expert level exam was fully remote in terms of the proctored written and practical exams. I did expect it to stay remote but after this release we can see it is in fact required to be taken in-person. There are not yet details explaining where the exam is taken in terms of local (proctored via a standard local testing center or only at Fortinet offices), however I imagine this will come soon.
The second big update is something I had previous asked our AM about: whether my FCS and FCSS certifications would qualify me for the NSE8 prerequisites. The answer is yes!
Going off of this I’m going to go ahead and cross all 3 pre-reqs off my checklist:
I will of course confirm this with our AM as well, just in case. However, for now it just means I don’t have to spend the time re-taking 2-3 additional exams, which is nice.
The final update is the change in date for the first day to take the NSE8, July 15th. I imagine we’ll see at least 1-2 more big updates like this for the NSE8 before July 15th, so I will continue to keep a very close eye on anything released from Fortinet as well as updates to the NSE8 Pre-Release Guide.
I don’t have any major study updates this week I’ll leave it at that. Thanks for reading and best of luck studying for anybody following along!
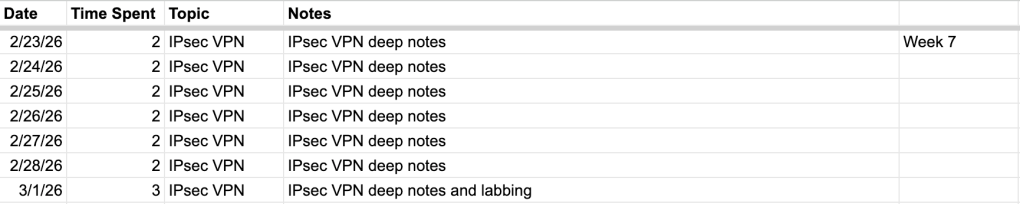
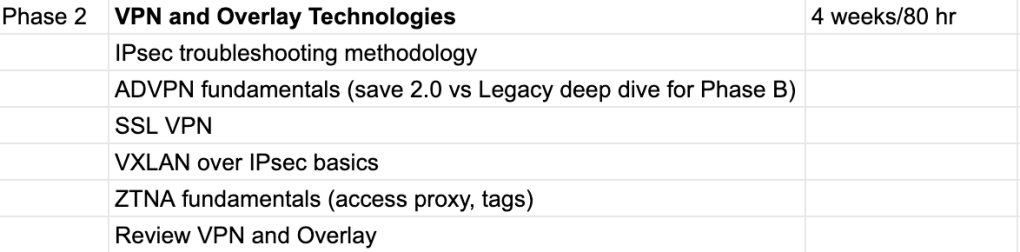
I’m slowly starting to lose track of the weeks here, but that’s not a problem. This past week has seen a lot of lab time. Between starting ADVPN for the first time and getting to SSL VPN migration scenarios I don’t see it ending any time soon. I have the schedule mapped out for anywhere from 4-6 works on IPsec VPNs (including ADVPN, migrations, a little ZTNA) and this block is a bit different from routing in that everything really falls under IPsec. Therefore it’s all one document that I’m taking deep notes in and we’re almost up to 60 pages. I think I like this structure a little better because I know exactly how to spend my time – as long as it’s something IPsec related it’s time well spent.
Something fun I’m starting to run into is the need to expand the Azure lab. I mentioned last week I began setting up a domain controller. So far this week I’ve built a working RADIUS connection for SSL VPN (and IPsec) and am on the cusp of a working LDAP configuration – although I have a feeling it’s going to be LDAPS by the time I get it working. I really did think it was going to be another 2 months before I’d breaking into authentication in the lab but once the DC was stood up I didn’t see any reason not to dive in.
Between those last two points I want to emphasize my focus for the next week – SSL VPN to IPsec VPN migrations, as I call them. For some reason I have a feeling there will undoubtedly be one of these exact scenarios on the exam. Therefore I’m labbing out every permutation I can think of:
local authentication + split DNS + full tunnel + custom TCP port
LDAP authentication + split tunnel + DNS suffix
RADIUS authentication + split DNS + split tunnel + custom port
…
It’s a fun little challenge that’s keeping me focused and covers multiple topics at once. I’ll leave it at that, thanks for reading.
As usual, we start with the tracker for the past week:
I wish I had the time and care to insert that “It’s all X? It always was.” meme with the two astronauts. In my case it would be all IPsec this week. IPsec is near and dear to my heart in that, like BGP, I deal with it just about every single work day. Between standing up new tunnels with partner enterprises or simply thinking about how data traverses our network, IPsec VPNs are involved. The piece here that I’m exciting about as studying is chugging along is getting to lab out IPsec Dial-Up remote access VPNs. Our organization is still on SSL VPN and we’re right up to that time where a migration to IPsec VPN is making its way up the priority list.
One quick lab update. I’ve stood up a “DC” in Azure. A little F1 Windows Datacenter 2025 VM that I’m using to begin labbing out RADIUS, SAML, and LDAP authentication for IPsec dial-up VPN. Luckily I was able to configure it pretty cheap and I’m only sitting at just over $20 a month for the box. Given that I’ll only turn it on when actively using it I’m expecting a dollar or two a month overall. Again, I want to keep providing lab cost updates here just to track the cost comparison of a fully virtual lab in Azure versus investment in a metal server and Hyper-V.
Motivation is better this week. The switch from reviewing routing to beginning a “new” subject is definitely the cause. It’s nice to learn about entirely new subtopics and begin labbing out scenarios I haven’t seen before. Soon enough I’ll be able make use of that FortiAuthenticator eval license I was provided and integrate FAC with IPsec VPN (but I’m going to come back to this during the authentication section in a couple months, I don’t want to have to request another 60 day FAC eval license after just how long it took the first time).
I’m coming up on the end of our first section, routing, after right around 100 hours of studying. Let’s get to the tracker:
This past week has been slightly different in that I did divert from my consistency in daily studying while I completed an overnight maintenance window for a network migration at work (and subsequently recovered from the sleep change). However, progress is still very consistent and after another 1-2 hours of studying tonight I will go ahead and move to the next section, VPN and Overlay Technologies:
I’m excited to get going on this next phase as I have found myself slowing down and losing momentum during this routing review period I’ve been in over the past week and a half.
My only other major update is that I’ve finally received some evaluation licenses from Fortinet for a few FortiGate VMs, FortiAnalyzer, FortiManager, and FortiAuthenticator. There really won’t be application for anything but the FGTs for at least another couple of months so we’ll keep the rest stashed until then. Although I may try to set up ADVPN in the lab which I believe requires FMG.
A short update this week, and no update last week so I went ahead and posted my BGP deep notes as articles. I’ll likely do more of those moving forward for my more comprehensive notes – It forces me to extensively verify the claims I make in notes and make sure I’m keeping very high documentation standards.
When a router learns a route via BGP, the route says “to reach network X, send traffic to next-hop Y.” But what if next-hop Y isn’t directly connected to your router? The router needs to figure out how to reach Y first. Recursive resolution is when the router looks up the next-hop address in its own routing table to find the actual outgoing interface and gateway to use. config router bgp set recursive-next-hop enable end
By default, BGP routes are not considered when a BGP next hop requires recursive resolution (only static, connected, OSPF, etc.). They are considered when recursive-next-hop is enabled. Recursive resolution will resolve to one level.
Conditional Advertisement
BGP Conditional Advertisement allows the router to advertise a route only when certain configured conditions are met.
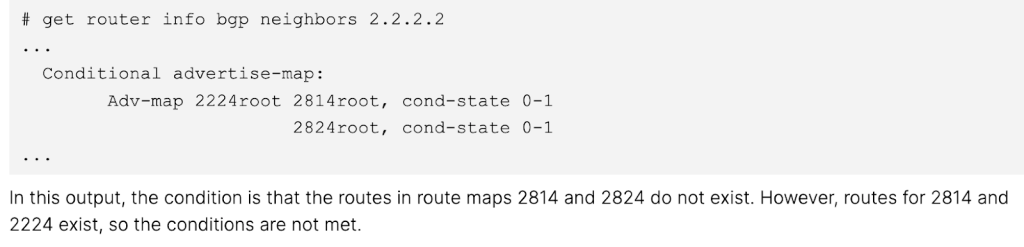
config router bgp
    config neighbor
        edit "2.2.2.2"
            config conditional-advertise
                edit "2224"
                    set condition-routemap "2814" "2824"
                    set condition-type non-exist
                next
            end
        next
    end
end
The above example configuration states that the route maps objects, 2814 and 2824, will only be advertised if they do not exist. In this scenario, the route map has match conditions for three subnets, 172.28.1.0/24, 172.28.2.0/24 and 172.22.2.0/24. This means that if the peer network advertises any of these three subnets to the FortiGate, the FortiGate will not advertise these three networks back out.
The route maps listed within set condition-routemap are the conditions that must be met in order to execute the advertise-routemap (“2224” in this example).
Given that two condition route maps are set in this example, both the 2814 and 2824 route maps route map conditions must not be met (non-exist) in order for the 2224 route map to be advertised.
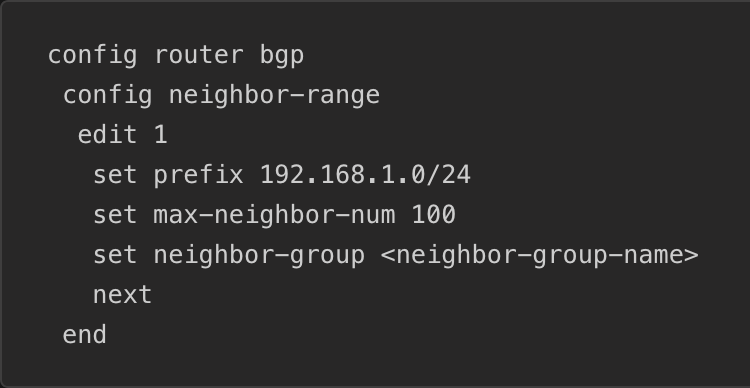
Neighbor Range
A Neighbor Range allows for you to specify a subnet such that neighbors will be configured automatically if their source IP falls within that range.
Neighbor Group
Neighbor Group can be used to share the same neighbor attributes among group members, avoiding having to repeat configurations for multiple neighbors. config router bgp config neighbor-group edit "sites" set soft-reconfiguration enable set remote-as 65510 set local-as 65520 set local-as-no-prepend enable set local-as-replace-as enable set route-map-in "filter1" set keep-alive-timer 30 set holdtime-timer 90 set update-source "port1" set weight 1000 set password ENC ****** next end end
This could be useful when you are peering from a hub to many spokes that all use the same password. You can assign all of your spokes to the same neighbor-group and simply set password ENC [password].
As seen in the section above, you can also apply a neighbor-group from within a neighbor-range, which will set the neighbor-group conditions to any peers within the specified range.
When using a Neighbor Group, the FortiGate will respond to peering requests within that range but not initiate requests itself. This is a default behavior that can be changed via set passive disable.
Address and Address Group objects as BGP Networks (FortiOS 7.6+)
Rather than setting and keeping up to date your list of BGP networks manually, you can include addresses and address groups.
Within your Address or Address Group object, set allow-routing enable.
Only IP subnets and Interface subnet objects (address objects auto-created when you create an interface) can be referenced, not FQDNs, IP Ranges, Geographies, dynamic address objects, etc.
Default Originate
Enabling the capability-default-originate command within a peer configuration will cause the FortiGate to advertise the 0.0.0.0/0 default route to the peer without including 0.0.0.0/0 in the list of BGP networks.
Secure BGP sessions with MD5 hashing
Within a peer configuration you can set password [password] to force authentication with your peer. The same password will need to be set on the peer.
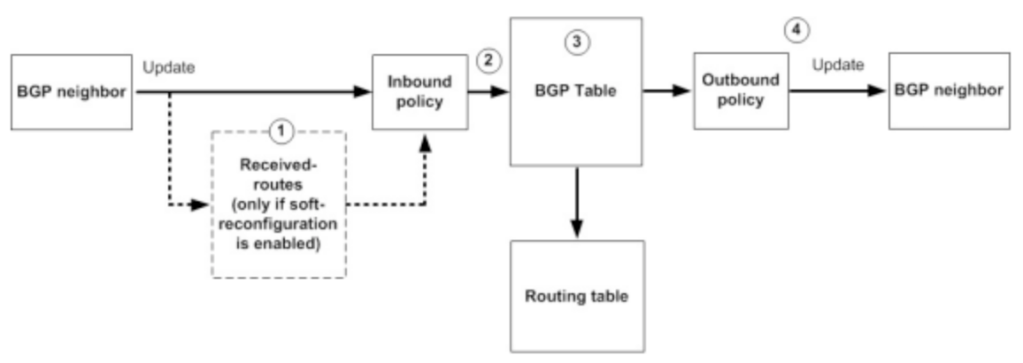
Soft Reconfiguration
BGP is configured such that inbound filtering only occurs when routes are received from your peer. When soft reconfiguration is enabled, it stores a copy of the pre-filter routes locally in memory. This allows you to update filters and “re-run” the routes through them to result in an updated post-filter set of routes without necessitating a BGP hard-reset.
When soft reconfiguration is enabled, you gain the ability to see received routes pre-local-filtering.
get router info bgp neighbors [peer IP] received-routes will show your pre-filter received routes.
get router info bgp neighbors [peer IP] routes will show your post-filter received routes.
Route Refresh
Just like Soft Reconfiguration, Route Refresh was created to solve the issue of necessitating a hard BGP reset every time you change your filters. Route Refresh, however, allows for this capability without the additional memory and CPU load created by storing a pre-filter set of routes. Route Refresh simply sends a message to the peer when the local filters are updating, asking for updated pre-filter routes.
The one downside of Route Refresh has a slightly slower update/refresh time, roughly 30 seconds, based on the default eBGP advertisement-interval.
Route Refresh is enabled by default on modern FortiGates.
Soft Reset and Hard Reset
A hard reset drops all of your peering’s BGP routes from the routing table and forces a temporary shutdown of the BGP session itself.
Technically you should not “need” to soft reset after an inbound route filter change, as the enabled-by-default Route Refresh capability should send an update message after the change, however I often soft reset out of habit and extreme impatience.
Outbound route filter changes will necessitate a soft reset as Soft Reconfiguration and Route Refresh capabilities do not apply to advertised routes.
Summary: Soft Reconfiguration, Route Refresh, Soft Reset, Hard Reset
Soft Reconfiguration: Store received routes before policy application in memory
Route Refresh: BGP capability to request peer to re-advertise all prefixes
Soft Reset: Reapply policies, keep the session
Hard Reset: Drop TCP session, full BGP re-establishment
Next Hop Self
The next-hop-self configuration will need to be applied to a peering any time the next hop for a route it is advertising is not reachable by its peer. This is commonly seen with iBGP routers advertising eBGP routes and in hub-and-spoke topologies where spokes peer through the hub.
Next Hop Self is not required in eBGP peerings as eBGP changes the next hop for routes it advertises.
next-hop-self-rr is used to set the next hop to self for routes a RR reflects.
Commonly used to force hub transit.
Maximum Prefixes
You can configure a maximum number of prefixes that are allowed to be received by a peer.
When the maximum prefix amount is hit, the BGP peering will be torn down.
The BGP session will continue to flap up and down each advertisement-interval, 30 seconds by default, until the number of prefixes received falls back below the limit.
You can set maximum-prefix-warning-only enable to only produce a log when the prefix limit is reached. This will show up in System Events > Router Events and could then be used via Automation Stitches or FortiAnalyzer Event Handlers to notify NOCs or attempt auto-remediations.
A use case here is stopping a peer network that you don’t control from injecting mass amounts of networks into your, in case of a misconfiguration.
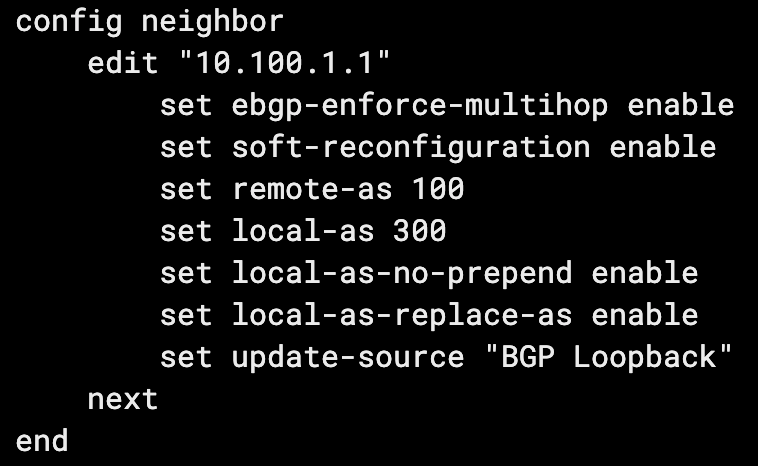
Local AS
You can config the Local AS setting to mask your actual AS, from the perspective of your peer. I recently ran into a real use case for this when standing up a BGP peering with one of our partners at work. We use a very common private AS and so do they. We set local-as [AS] and we appeared as the masked AS from their perspective, allowing us to peer without conflict or issue.
Setting local-as-replace-as will stop your real AS from being included in the AS path from the perspective of your peer (their received AS path from you).
Setting local-as-no-prepend will stop your local AS from being included in the AS path on inbound routes.
BGP Multipath
While covered more comprehensively in the dedicated ECMP document, it’s worth mentioning the BGP-specific ECMP configurations. ECMP, or Equal Cost Multipath, allows for multiple paths (interfaces) to the same destination (networks) to be used simultaneously. To allow multipath, the following BGP configuration should be applied:
config router bgp
    set ebgp-multipath enable
end
And/Or:
config router bgp
    set ibgp-multipath
end
For paths to be eligible for eBGP/iBGP multipath, they must have the same local preference, AS path, origin, MED, and next-hop reachability. The neighbor BGP router ID and neighbor IP address attributes are not required to match.
The maximum number of eBGP/iBGP additional paths to be considered for multipath can be configured with the following commands:
config router bgp
    set additional-path enable
    set additional-path-select [2 - 255]
end
BGP Aggregation/Summarization
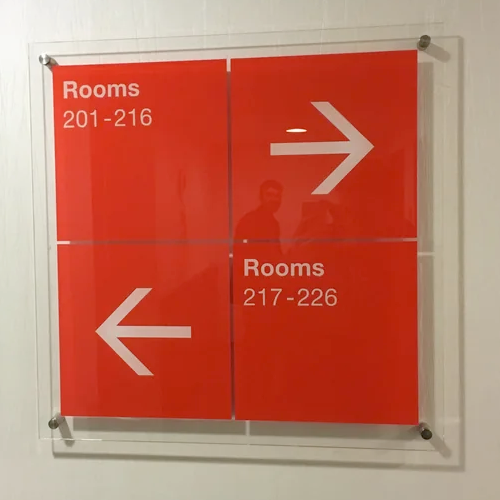
Aggregation allows you to summarize multiple specific routes into a less specific route including the specific members. The only decent metaphor I can think of for this is when you visit a large hotel. You walk down the hallway and there are normally signs that point you towards a group of room numbers. Rather than the sign having an arrow for every specific room number, it has a range of room numbers.
Even if the room “205” didn’t exist and was actually just a utility closet without a room number, you’d still say rooms “201-216” were to the right. This is what we see in route summaries. For example we might have the following routes advertised to our neighbor:
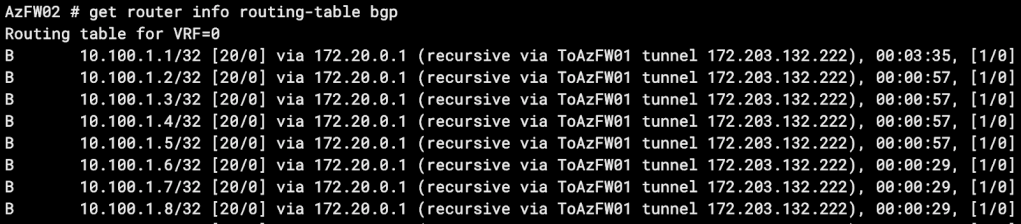
Rather than the neighbor receiving 8 routes for these 8 specific destinations, we can advertise a summary route that includes all 8 destinations. In this case, we’ll advertise 10.100.1.0/28. Here’s how we configure it:
config router bgp
    config aggregate-address
        edit 1
            set prefix 10.100.1.0/28
            set summary-only enable
        end
    end
end
After a soft reset, when we check out routes received by our peer we see this:
You can imagine how valuable this becomes, especially if you’re advertising hundreds or thousands of specific routes. One thing to note is that 10.100.1.0/28 includes the IP host range 10.100.1.1 – 10.100.1.14, meaning our peer will route 10.100.1.9 – 10.100.1.14 to us, even though we don’t actually have a route to these hosts.
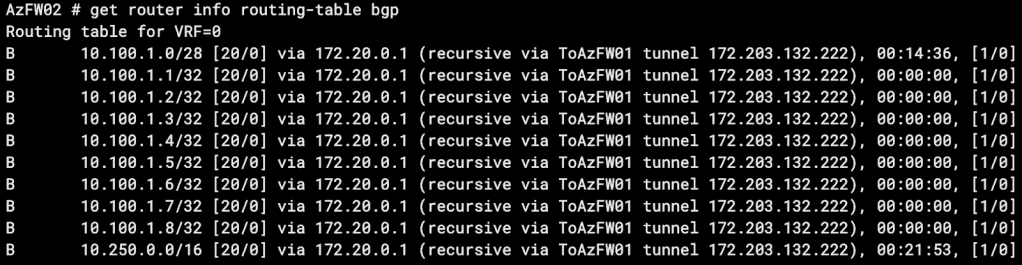
It’s also important to note that in our configuration we enabled the summary-only setting. Let’s turn that off, soft reset, and check our peer received routes again:
You can see we actually received the summary route as well as all of the specific routes.
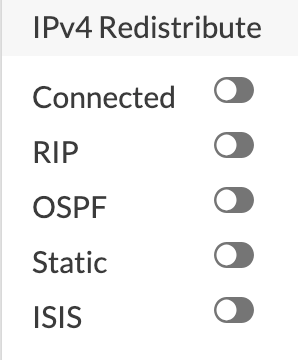
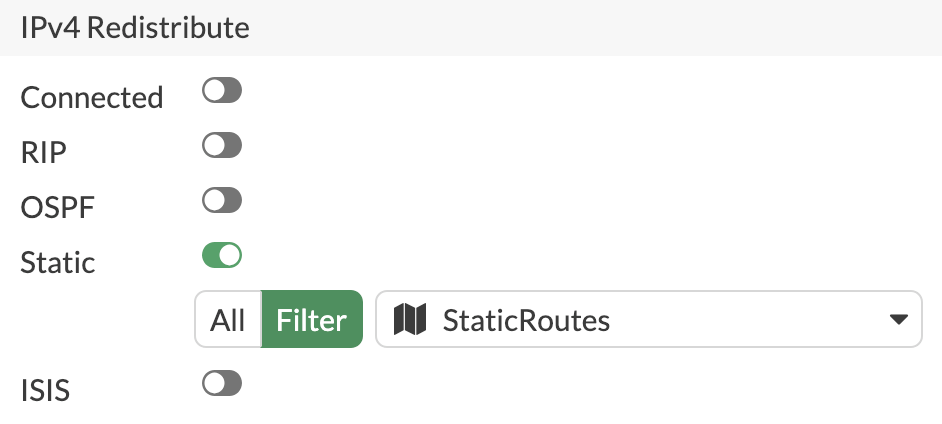
Route Redistribution into BGP
Redistribution allows you to inject other routes on your FortiGate into BGP, allowing you to advertise the injected routes to your BGP neighbors. On FortiGate, you can redistribute the following route types:
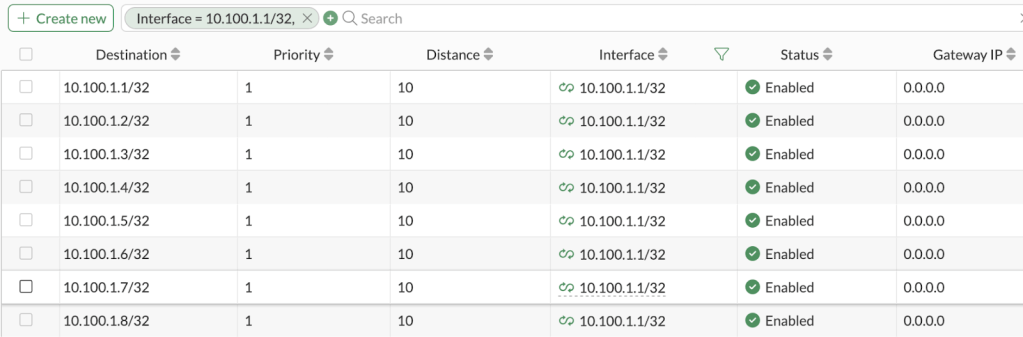
In our lab we have these 8 static routes that our peer doesn’t know about, but we want them to.
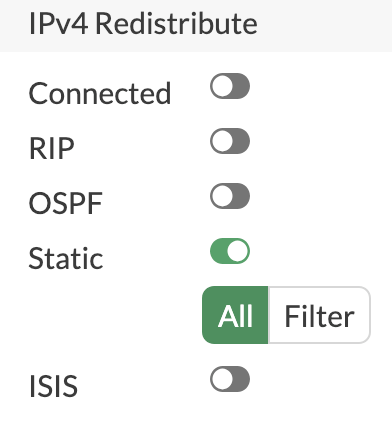
In our BGP settings we simply turn on Static redistribute and the routes will be advertised:
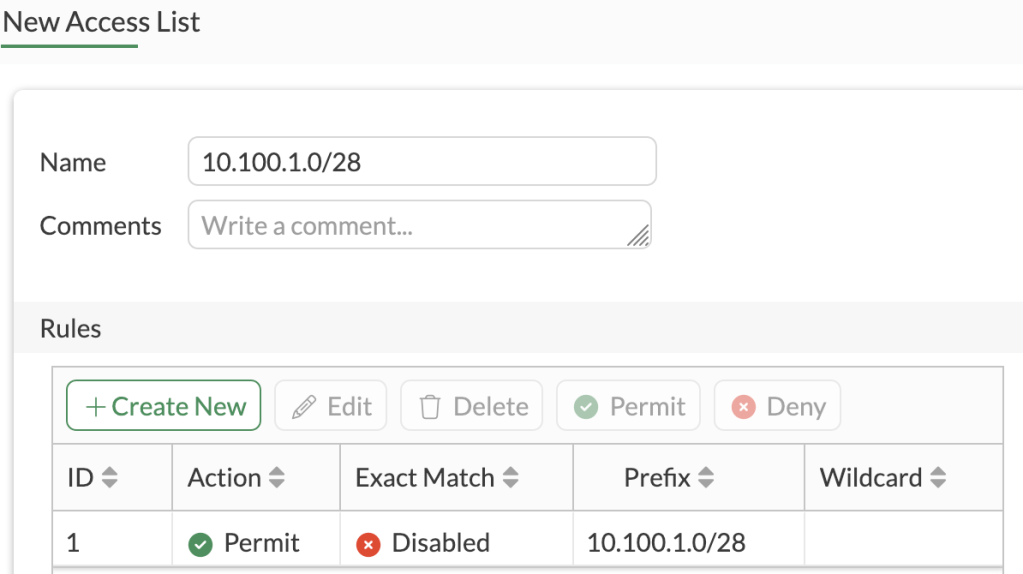
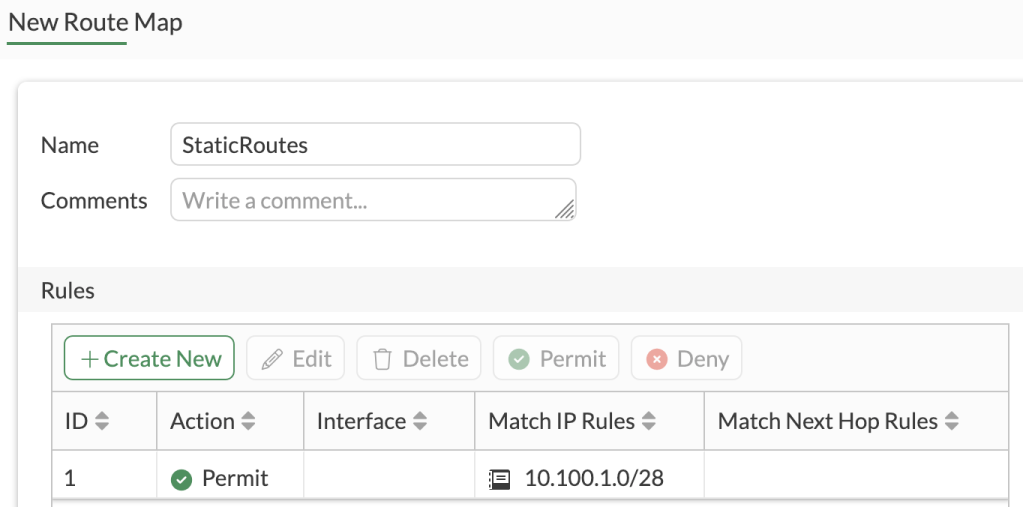
However, in our lab, we actually have quite a few additional static routes that we don’t want our peer to know about, so we’ll apply a filter. We only want to advertise our routes that fall within the 10.100.1.0/28 subnet, so we’ll create an Access List to match that subnets within (exact match disabled). We’ll then create a Route Map with an Allow rule matching the Access List, and apply that Route Map to the Static redistribution configuration.
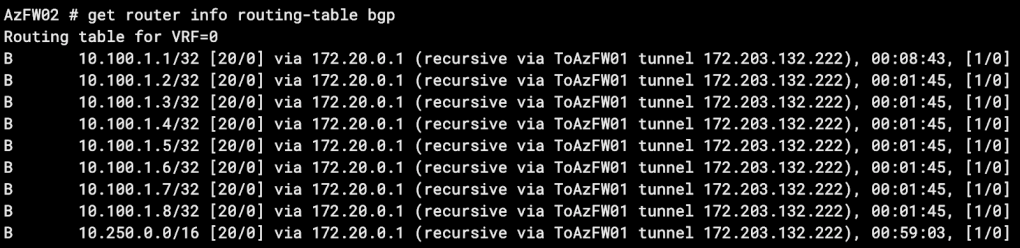
We’ll soft reset our BGP peering and check received routes on our peer router:
Something to consider regarding redistributing routes vs. simply adding them within your BGP networks configuration – when redistributed routes are received, the origin code will be a ?, while routes configured in BGP networks will show an iBGP origin.
In the picture above, the 10.100.1.1 network is included in our BGP networks configuration, while the other 3 networks are redistributed.
BGP Network Import Check
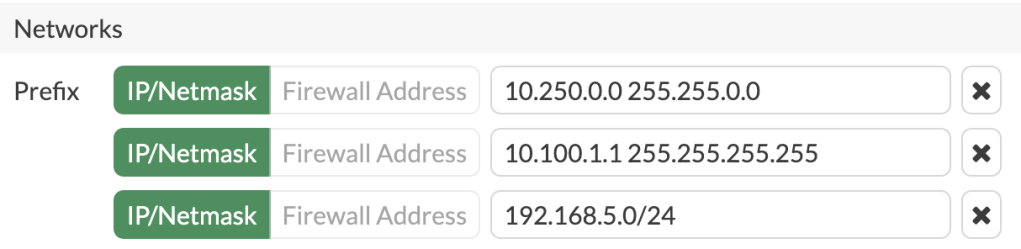
By default, BGP will not advertise a route included in its networks configuration if the route doesn’t already exist in the FortiGate’s routing table. For example, you may include the 192.168.5.0/24 route in your BGP config because that subnet represents a connected interface on your FortiGate. BGP will be able to advertise the route because there is already a 192.168.5.0/24 directly connected route in the RIB. If you attempt to advertise a route via BGP that you don’t have a route for, it won’t be sent out. You can allow this non-default behavior with the set network-import-check disable setting.
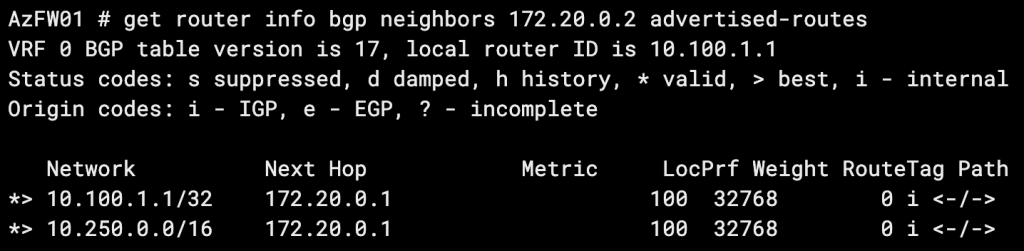
Let’s try it in the lab! We’ll add a network to BGP for which we don’t have an existing route in our RIB (192.168.5.0/24):
We check our advertised routes and see that subnet isn’t being advertised:
Now let’s turn off network-import-check:
When we check our advertised routes again, our route is there!
BGP on Loopback Interfaces
The common situation that leads to the BGP on loopbacks design is seen when you have peerings between two sites with redundant connections. For example you may have a hub-and-spoke design, with each spoke site having 2 or more ISP connections for redundancy. You’ll likely have IPSec tunnels or private links back to your hub. This will require two BGP peerings and four peer IPs, resulting in at least 2X the configuration time and a possibility of asynchronous routing. If you expand to 3 redundant links, now we’re looking at 3X the configuration time and a serious headache.
BGP on loopbacks solves this by creating your hub-to-spoke peerings using the loopback interface IPs themselves.
BGP on Loopback (Over IPSec VPN) Requirements:
BGP Peering Settings:
update-source set to the loopback interface
enforce-ebgp-multihop enabled (eBGP only)
Firewall Policy:
A firewall policy allowing TCP port 179 traffic to your loopback from your link port (IPsec tunnel interface, physical port, VLAN, etc.)
Routing:
A static route from your loopback to the peer loopback via each link port OR
An SD-WAN health check with a destination on the peer (typically a loopback interface, but NOT the BGP loopback interface*) and the two link ports as members
*Thank you Kevin for your correction here. Please see this article for a complete explanation as to why the peer’s BGP loopback must not be used as the health check IP.
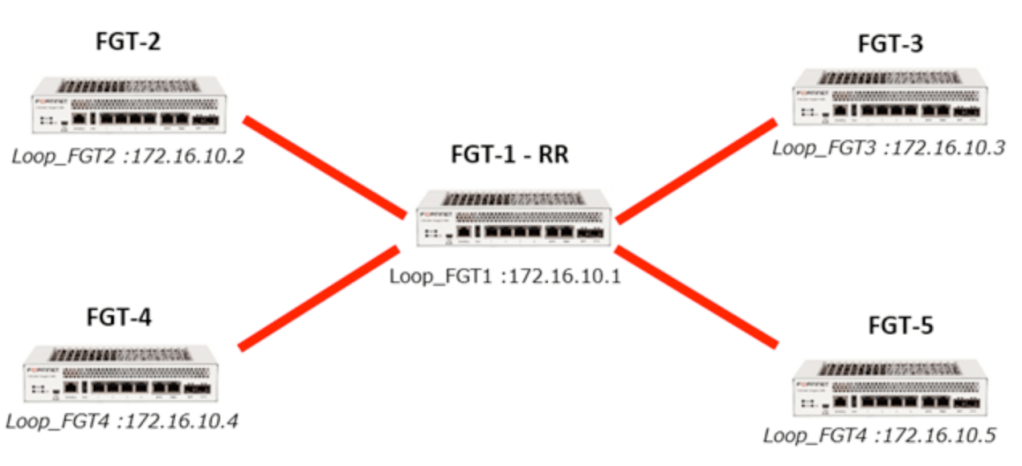
Route Reflectors
Route Reflectors are used in iBGP to reduce the number of peerings required by a full-mesh topology. Their use is best depicted by the transition between these two diagrams:
Simply described, rather than peering all routers with all other routers, all routers just need to peer with a route reflector.
Routes advertised to the router reflector are then advertised to all of its other peers.
The router reflector FortiGate will act as such when you enable set route-reflector-client within its configuration with each of its peers.
A router reflector cannot modify BGP attributes for routes that it reflects, but it can block reflected routes via route maps (or other BGP filtering methods).
Starting in 7.6.1, with the application of the rr-attr-allow-change config, the RR can modify attributes.
Routes received by the RR, from a non-RR client, will be advertised to RR clients only.
Routes received by the RR, from an RR client, will be advertised to both RR clients and non-clients.
Routes received by the RR, from an eBGP neighbor, will be advertised to both RR clients and non-clients.
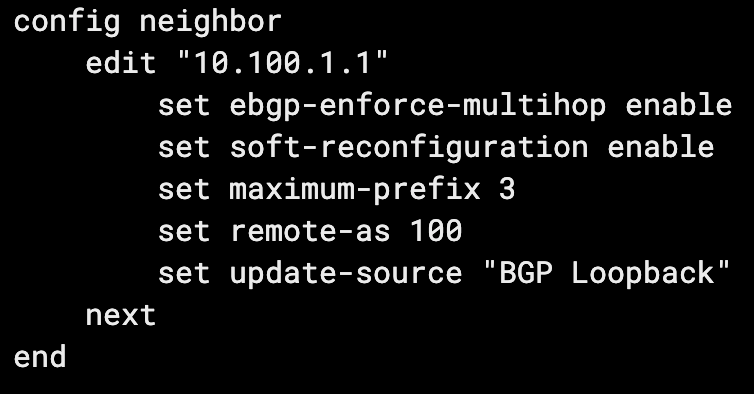
OSPF + iBGP on Loopbacks Configuration on FortiGate
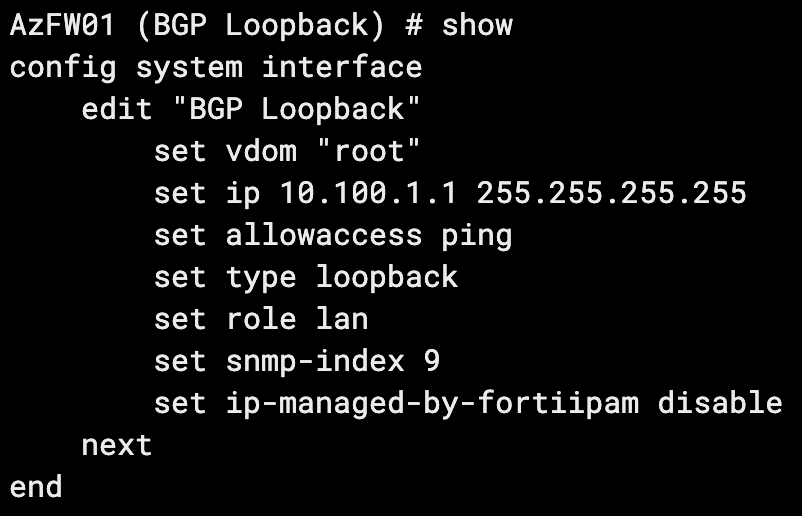
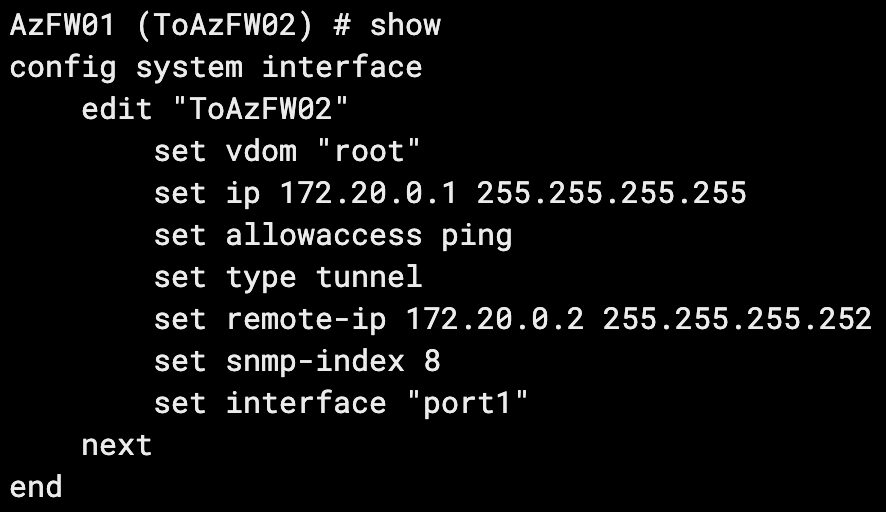
This routing configuration is commonly recommended in the networking community for its scalability and simplicity. OSPF is configured to share routes to loopback IPs. BGP is sourced from the same loopback IPs to allow for dual-WAN and multiple IPSec tunnels from each spoke router without having to stand up multiple BGP peerings. Here’s how to configure it in its simplest form between two FortiGates.
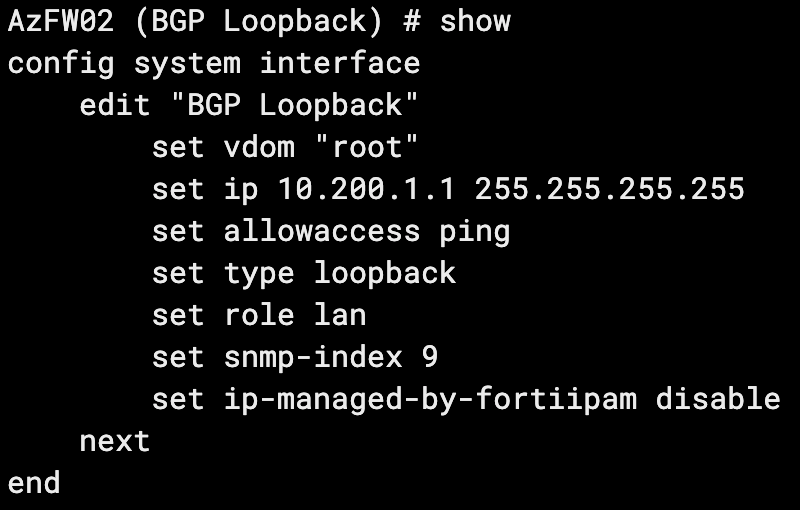
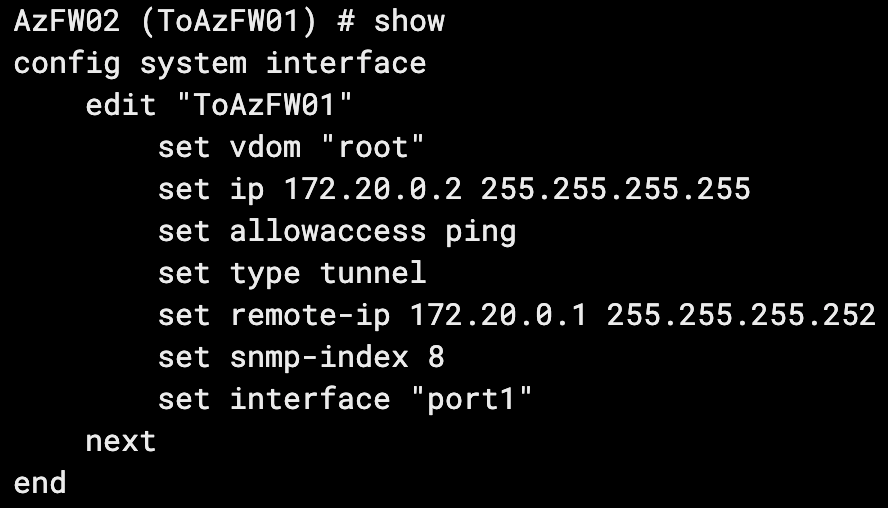
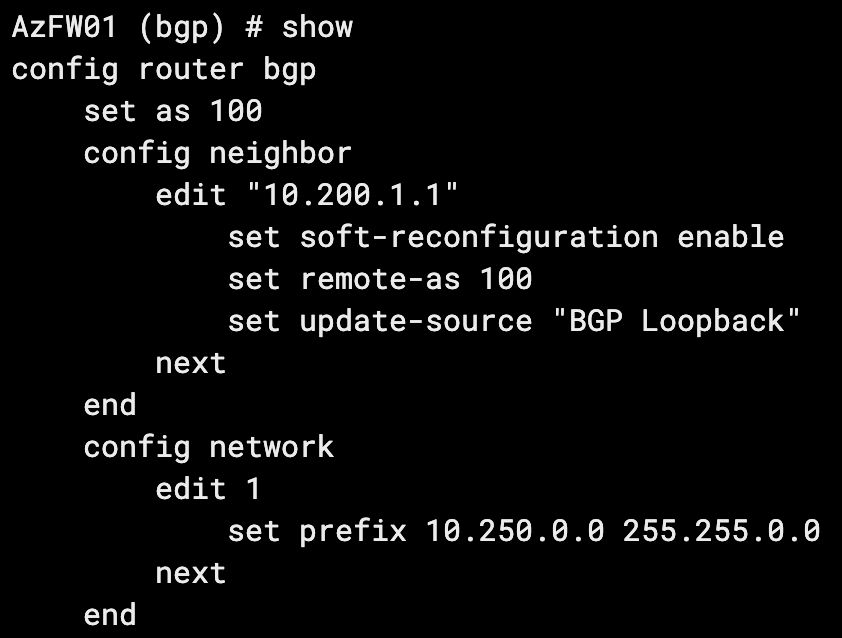
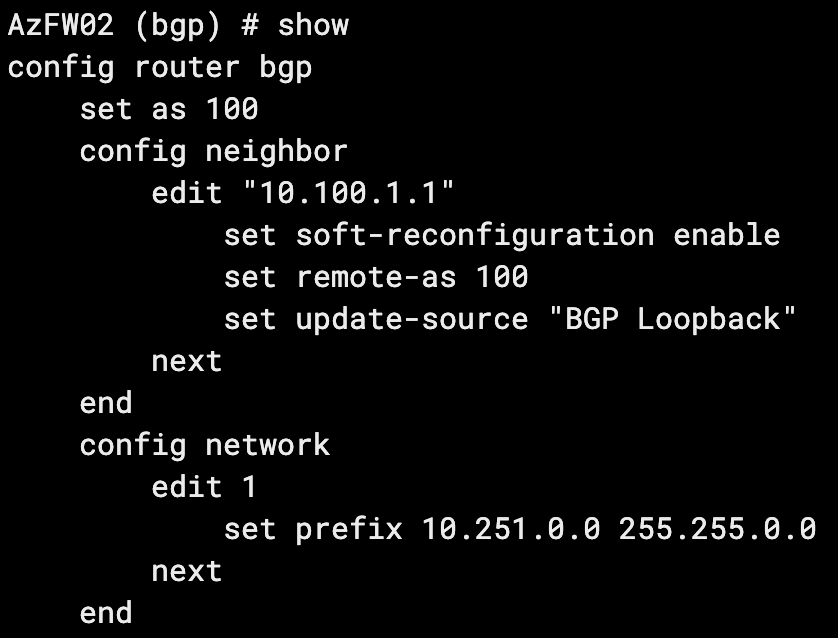
For this example, my lab is running two Azure FortiGate VMs, connected via an IPSec tunnel. Our loopbacks and tunnel IPs are as follows:
AzFW01
Loopback: 10.100.1.1
Tunnel IP: 172.20.0.1
AzFW02
Loopback: 10.200.1.1
Tunnel IP: 172.20.0.2
CLI Configurations:
On our tunnel interface, we ensure we set our remote IP as our far side tunnel interface IP.
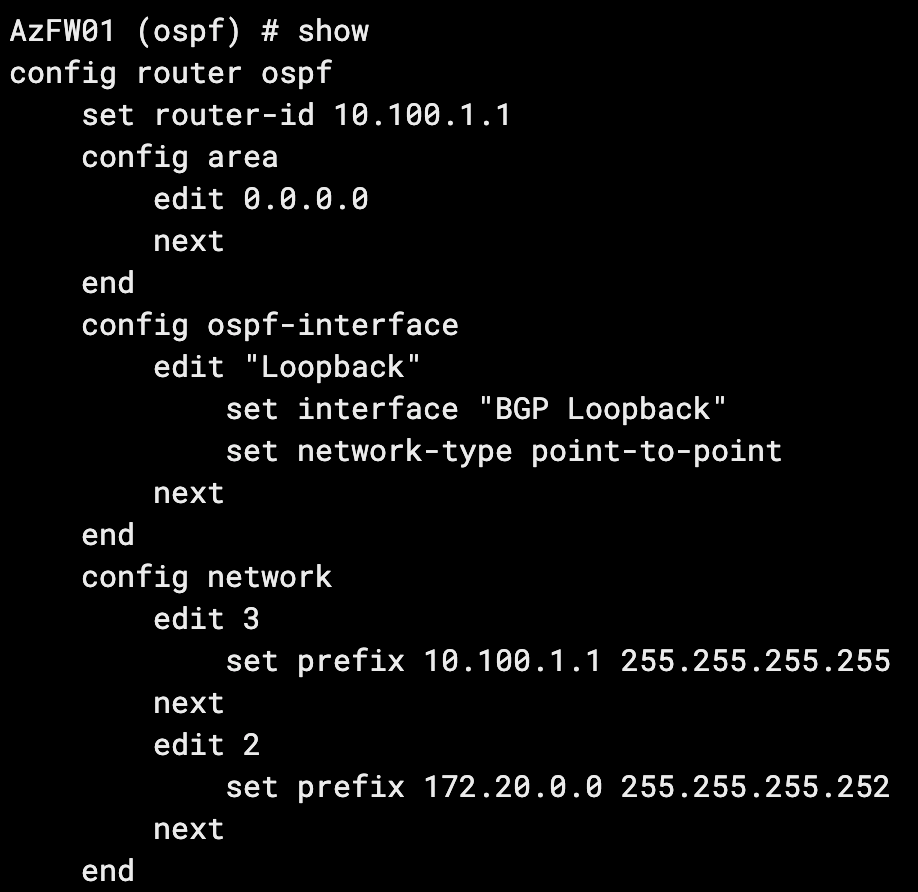
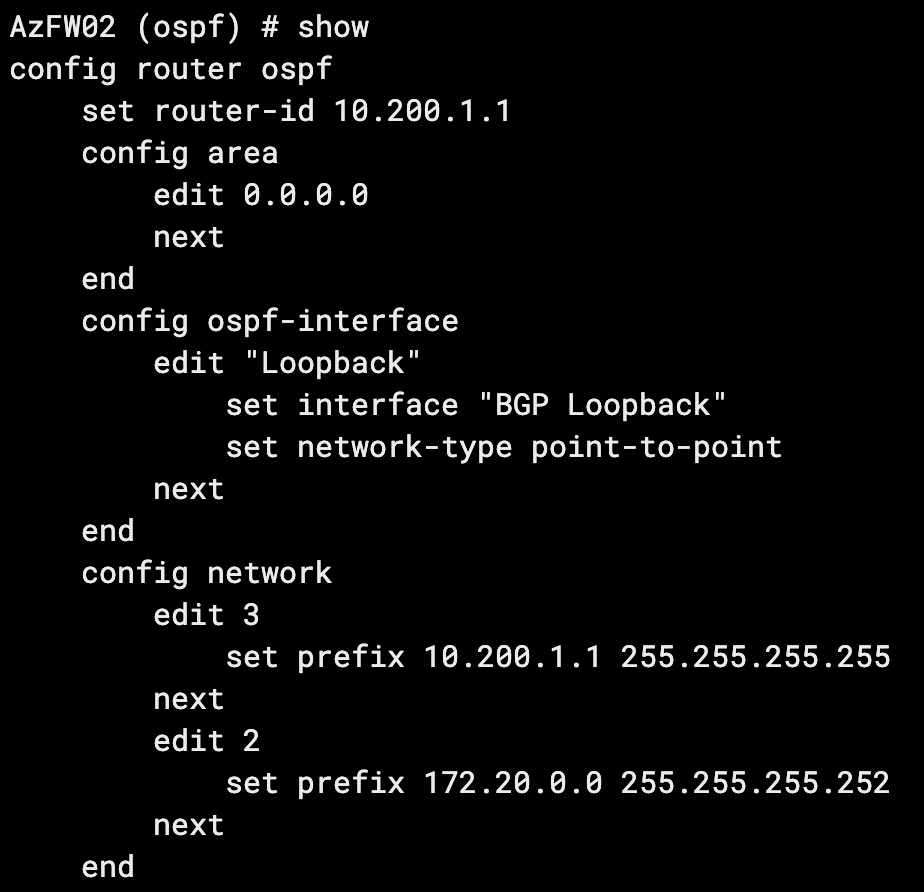
Now that our interfaces are configured, we can configure OSPF.
Key considerations:
For simplicity’s sake we’re using a single area for our entire hub-and-spoke topology (scaling out the lab to 20+ spokes).
The OSPF interface network type must be manually set to point-to-point. It will default to broadcast.
With the above configuration on both firewalls, our OSPF adjacency has come up:
And we have a route to our far-side loopback:
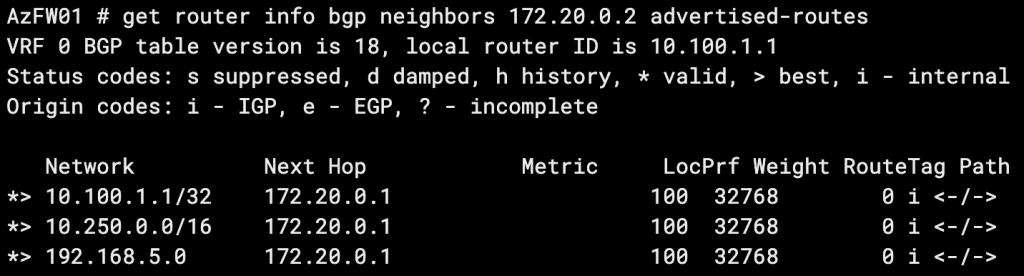
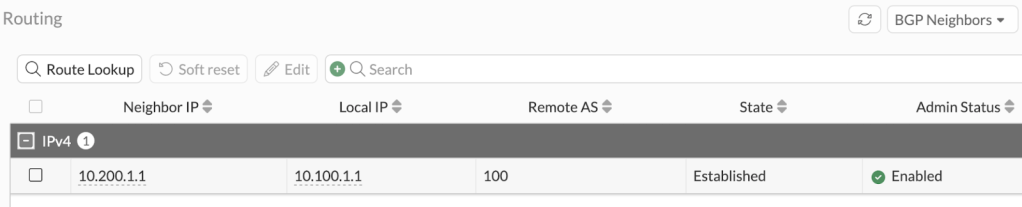
Finally, we’ll configure BGP on both routers and use the update-source setting to peer via our loopbacks:
Our BGP peering is up:
And we have received our neighbor’s 10.251.0.0/16 route:
Access Lists are simply a list of subnets with an action of permit or deny applied.
Access lists are commonly referenced within Route Maps like variables in programming or address objects/address groups on FortiGates – or they are applied directly to a BGP peering.
Access lists are not exclusive to BGP, they are also frequently used in OSPF route control.
A common configuration within an Access List entry is the “Exact Match” attribute, which will only “match” a subnet if it is exactly the same IP and subnet mask. If the Exact match attribute is disabled, as it is by default, the list will match any subnet equal to or smaller than it.
For example, without exact match and 10.5.0.0/16 configured as an Access List entry, the networks 10.5.10.0/24, 10.5.59.0/29, and 10.5.150.10/32 will all match the entry.
An Access List can be directly attributed to a BGP peering by enabling the distribute-list-in and/or distribute-list-out and selecting the Access List object.
Access Lists can also be applied to route maps.
An access list, when applied directly to a BGP peering, will have an implicit deny functionality for subnets not matched by the list.
Prefix Lists
Prefix Lists are very similar to Access Lists in that they also are used to match subnets. Prefix tangents the capability of Access Lists by allowing you to set a greater than (ge) or lesser than (le) operator in relation to the subnet’s CIDR notation integer.
For example, if you set a Prefix List with the value 10.0.0.0/8 le 16, it will match all subnets less than or equal to /16 within 10.0.0.0/8. 10.1.0.0/10 would be allowed while 10.250.10.0/24 would not.
In BGP, Prefix Lists can be applied directly to a BGP neighbor via the prefix-list-in/prefix-list-out configuration, or applied to route maps (which are then applied to BGP neighbors).
A prefix list, when applied directly to a BGP peering, will have an implicit deny functionality for prefixes not matched by the list.
AS Path List
An AS Path List uses Regex (Regular Expressions) to match an AS and be used either in filtering or matching criteria within a route map.
Regex is a way to describe a pattern of text you’re looking for—like telling a FortiGate “find me anything that looks like an IP address” instead of searching for one specific IP. config router aspath-list edit "list1" config rule edit 1 set action permit set regexp "^6550[1-3]$" next end next end
Practically, an AS Path List can be used to match, for example:
ASs ending in 001
ASs starting with 20
ASs ending with even numbers
Anything above AS 65400
An AS Path List can also be used as a matching criteria for a neighbor group, allowing you to dynamically group peers based on any pattern of AS. When using the remote-as-filter on a neighbor group, you cannot also use the remote-as attribute. config router bgp set as <local AS> config neighbor-group edit <name> set remote-as-filter <BGP filter> next end end
Community Lists and Community Strings
Community lists are lists of BGP attributes called Community Strings, commonly used to filter and control routes. config router community-list edit <name> set type {standard | expanded} config rule edit <id> set action {deny | permit} set regexp <string> set match <string> next end next end
There are two types of community lists: Standard and Expanded. Standard lists match strings exactly and are used for simple filtering. Expanded lists are based on Regex patterns, to match patterns of communities.
Community strings are created in the [AS]:[#] format, for example 65001:1.
Community strings are transitive, meaning they are shared with your peers’ peers. However, it is the default behavior on FortiGate that community strings are not sent to peers unless you configure set sent-community enable on the peering.
Each community list rule is associated with a permit or deny action, allowing or blocking routes matching the community list.
Community lists can be used within route maps to apply actions such as modifications of attributes of routes.
Creating match conditions for multiple community strings (one ID per rule) within a single community list will create an “OR” match condition.
Creating matching conditions for multiple community strings (multiple listed in the same rule, separated by a space) will create an “AND” match condition.
Well Known Communities
These are community strings known by FortiGate, as well as most routing network devices that support BGP. They have specific instructions for your peers and are often applied to route maps.
Some examples include:
NO_ADVERTISE: Tells the peer not to advertise the routes it receives from our peering.
NO_EXPORT: Tells the peer not to advertise the routes it receives from our peering to eBGP peers. Advertisement to iBGP peers is still allowed.
INTERNET: Applied by default. Tells the peer to advertise routes to all peers. Indicates the internet as a destination. All BGP-speaking networking devices belong to this community.
LOCAL_AS: Similar to no_export but allows advertisement within the sub-AS of a confederation.
Route Maps
A route is a list of rules that are applied in ascending order of ID, beginning with rule 1 on FortiGate. They can be used to apply custom actions based on matched conditions and are often used in conjunction with the other routing objects explained in this document. The most common usage I see is access lists matching specific BGP routes, applied to route maps using the route-map-in and route-map-out to permit those routes and apply local preference and AS Path prepending.
config router route-map
    edit <name>
        config rule
            edit <id>
                set action {permit | deny}
                set match-as-path <string>
                set match community <string>
                set match-ip-address <string>
                set match ip6-address <string>
                set match-ip-nexthop <string>
                set match-ip6-nexthop <string>
            next
        end
    next
end
Every route map has a permit or deny action, with the default set to permit if an action is not set.
Route map entries appear in the order that they are configured. To “reorder” then, set a rule’s ID to a less or greater value than other rules in the list. They will still appear out of order in the GUI, but will be evaluated ascendingly by their ID.
Route map entries are evaluated in order, once a rule is matched, processing stops.
Route maps can also be used with OSPF and RIP.
If no rule in a route map matches a route, the route is implicitly denied.
Additional Notes on Routing Objects
After making changes to Routing Objects already applied to BGP peerings, changes will take effect in roughly 2-3 minutes, so long as the default Capability: Route Refresh has not been disabled within the peering settings.
If you wish to reflect a change sooner, “Soft Reset” the peering.
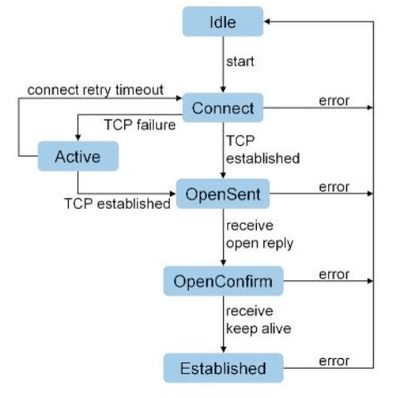
BGP States
When you configure a BGP peering from your FortiGate, then via the GUI or CLI check whether your peering is “up” with your neighbor, you’ll see one of the above states listed. The most common that you’ll see are Idle, Connect, and Established. Established is what you want, meaning the BGP peering is “up” and good to begin advertising and receiving routes.
Idle
The initial state after you have configured a neighbor from your FortiGate. No BGP connections have been initiated and all incoming connections are refused.
Connect
FortiGate has initiated a connection to the neighbor. FortiGate is listening for TCP connections from the neighbor.
FortiGate will send 6 total connection attempts over time (after 1, 2, 4, 8, 16, and 32 seconds). Waiting a cumulative maximum period of 63 seconds. BGP will then move into the Active state.
If any of the above connection attempts result in a successful TCP handshake, an Open message is sent to the neighbor and the state moves to OpenSent.
Active
FortiGate is listening for a TCP connection.
When this state begins, the ConnectRetryTimer begins counting down. Once it expires, the BGP peering moves back to the Connect state.
OpenSent
BGP is waiting for an Open message from the neighbor.
When an Open message is received, FortiGate checks it for errors. If no errors are found, BGP moves to the OpenConfirm state.
OpenConfirm
BGP is waiting for a Keepalive message acknowledging its Open message.
Established
The connection is confirmed and update messages are sent to exchange routing information.
BGP Timers
The following timers are set on a global BGP basis, with the exception of set connect-timer.
set keepalive-timer [3-65535]
Frequency at which FortiGate sends keepalive messages to established peers.
Can be set per-peer via set keep-alive-timer [3-65535].
The default keep alive timer is 60 seconds.
The keep alive timer should always be ⅓ or less than the holdtime timer. If a ratio above ⅓ is configured, the FortiGate will use a keep alive that is exactly ⅓ of the configured holdtime.
BGP must be hard reset to apply changes to this value.
set holdtime-timer [3-65535]
Maximum amount of time FortiGate will wait before marking a peer as dead.
Can be set per-peer via set holdtime-timer [3-65535].
The default holdtime timer is 180 seconds.
Keep alive and holdtimes are negotiated between peers, with the lesser value between the two being chosen.
BGP must be hard reset to apply changes to this value.
set advertisement-interval [0-600]
Minimum interval FortiGate will wait to send routing updates.
The default advertisement interval is 30 seconds.
This value is not required to match between peers.
Lower advertisement interval = faster convergence but more BGP UPDATE traffic.
set connect-timer [1-65535]
Maximum amount of time for the ConnectRetryTimer.
When ConnectRetryTimer expires, FortiGate will initiate a new TCP connection attempt to the BGP peer.
The default connect timer is 120 seconds.
No global BGP configuration for this timer, it is exclusively set on a per-peer basis.
set scan-time [5-60]
Background interval in which BGP checks next-hop availability of routes.
If a route’s next hop is not reachable, the route will not be used.
The default scan time is 60 seconds.
Can be set to 0 second to disable scan time, however this is strongly discouraged as the FortiGate will skip proactive next hop checks entirely.
FortiGateBGP Troubleshooting
Troubleshooting Commands
show router bgp
get router info bgp summary
get router info bgp network
get router info routing-table bgp
get router info bgp neighbors
exec router clear bgp all
What routes am I sending to my peer?
get router info bgp neighbors [peer IP] advertised-routes
What routes am I receiving from my peer? (Pre-inbound-filter, soft reconfiguration enabled)
get router info bgp neighbors [peer IP] received-routes
What routes am I receiving from my peer? (Post-inbound-filter)
get router info bgp neighbors [peer IP] routes
Check if the BGP port is listening
diagnose sys tcpsock | grep 179
Run a packet capture to verify BGP TCP session establishment
diagnose sniffer packet any 'tcp and port 179' 4
Soft Reset all peers
execute router clear bgp all soft out
Hard Reset all peers
exec router clear bgp all
Turn on BGP debugging
diagnose ip router bgp level info
diagnose ip router bgp all enable
diagnose debug enable
Flapping Routes
Route Flap occurs when there are changes to a network that cause a peering to go offline and routing to reorient. This is often seen when a FortiGate reboots, fails over to an HA pair, or intermittent packet loss is experienced on a circuit.
While the obvious solution is to solve the root problem in the case of circuit or power issues, there are often factors outside of your control that will require you to give BGP a bit more slack.
Flapping Routes – Option #1 – Holdtime Timer
The Holdtime timer is the maximum amount of time a BGP speaker waits for a keepalive message from a peer before declaring the peer dead. Any time a keepalive is received, the timer is reset to, by default, 180 seconds.
Lowering this value will cause BGP to failover faster by declaring peers dead sooner. Raising this value may be useful in a situation where BGP goes down for a period longer than 180 seconds before being restored.
Flapping Routes – Option #2 – Dampening
Dampening is a “smarter” solution in that it only applies once a route has flapped twice, and then will adjust based on whether the route continues to flap or not. Once dampening begins, a countdown timer begins, similar to the Holdtime timer, however with dampening the timer will extend itself each time the route continues to flap.
config router bgp
    set dampening {enable | disable}
    set dampening-max-suppress-time <minutes>
    set dampening-reachability-half-life <minutes>
    set dampening-reuse <integer>
    set dampening-route-map <string>
    set dampening-suppress <integer>
    set dampening-unreachability-half-life <minutes>
end
The countdown timer can also be thought of as a penalty, like being put in the penalty box or a child given a timeout. If the route continues to “misbehave” while in timeout, their penalty will continue longer.
You can adjust the levels depicted on the graph above in FortiGate using the equivalent configurations:
This is the penalty level at which the route will be suppressed.
The first penalty is 1000 by default, hence suppression beginning after the second flap once the penalty has reached 2000. In actuality, due to the penalty decay over time, the route will not actually be suppressed until the third penalty.
dampening-reuse = Reuse Limit (Default 750)
When the penalty falls below this level, the route is no longer suppressed.
dampening-reachability-halflife, in minutes (Default 15)
After 15 minutes, the penalty will reach 50% of the original value.
Increase this value for a longer penalty “recovery” time.
Only applicable to reachable routes.
dampening-unreachability-halflife, in minutes (Default 15)
Same as above but applicable to routes that are unreachable or withdrawn.
Reduce this value to allow suppressed routes to become eligible for reuse more quickly after they’ve stopped flapping.
dampening-max-suppress-time, in minutes (Default 60)
The maximum amount of time a route can be suppressed for.
Once the penalty falls below 50% of the Reuse Limit, the entire penalty is removed.
Flapping Routes – Option #3 – Graceful Restart
Graceful Restart is recommended to be used in situations when routing isn’t interrupted, but the router is unresponsive to routing update advertisements. The most common configurations affected by these situations are FortiGates in HA pairs, particularly during failovers and FortiOS upgrades (a occurs during upgrades).
config router bgp
    set graceful-restart {disable | enable}
    set graceful-restart-time <seconds>
    set graceful-stalepath-time <seconds>
    set graceful-update-delay <seconds>
    config neighbor
        edit 10.1.1.1
            set capability-graceful-restart {enable | disable}
        next
    end
end
When Graceful Restart is enabled and a FortiGate plans to go offline (FortiOS upgrade and other semi-controlled failovers), it will send a message to BGP peers stating that it plans to go offline temporarily and for how long. The peer routers will keep the FortiGate in their routing tables until the expected downtime is exceeded, preventing routing flaps.
In an HA pair, the BGP daemon only runs on the primary unit. When a failover occurs, Graceful Restart will tell the peer to keep the FortiGate its routing table, allowing the peering to stay up while the secondary is in the process of coming online.
The higher level config router bgp > set graceful-restart will enable Graceful Restart globally, while the config neighbor> setcapability-graceful-restartonly enables it with the single peer.
Enabling Graceful Restart will cause BGP to flap (reset).
For Graceful Restart to work, it needs to be configured on both sides of the peering.
Graceful Restart will delay the time until actual outages are realized by peers. The standard keepalive timeout for BGP is 3 minutes. With GR enabled, an additional 2 minutes are added by default, for a total of 5 minutes.
It is not recommended to use Graceful Restart concurrently with BFD.
BFD will detect the peering failure before GR can signal a Graceful Restart.